Log Upload and Firmware Upgrade
Version 1.0
1. Log Upload
1.1. Introduction
This manual is designed to guide users on how to upload the logs of plant protection drone and remote control, so as to facilitate subsequent data analysis, troubleshooting and equipment maintenance. With detailed steps, even non-professionals can easily complete the log upload operation.
1.2. Preparation
1. Agricultural Drone: Ensure that the drone is powered off and securely parked. The propellers should be locked to prevent accidental rotation during the operation.
2. Remote Controller: Ensure the remote controller has sufficient battery power, preferably above 50%, to avoid interruption during the entire upload process. Also, make sure that the remote controller is disconnected from the drone if it was previously connected.
1.3. Drone Log Upload Procedure
1. Connecting the Drone to a Mobile Device:
(1) Short press, then long press the power button on the drone to turn it on.
(2) Launch the Huida Drone App, and go to “Device management” from the home screen.

2. On the Device Management page, select “Log service”.

3. Enter the log reading interface, tap “Refresh the aircraft list”, the app will attempt to communicate with the drone and retrieve the flight log data stored onboard. The reading process may take anywhere from a few seconds to several minutes, depending on the size of the log files and the data transmission speed between the drone and the mobile device. Once the log retrieval is complete, the app will display all available log files stored in the drone in a list format.
4. Select the log files you wish to upload from the list. You can select files by tapping the checkboxes next to each file name. To select multiple log files, tap the checkboxes for each desired file. (A new log file is generated each time the drone is powered on and then shut down. If an issue occurred during the current flight session, make sure to restart the drone to generate a complete log file.)

5. Tap the “UPLOAD” button. Enter the reason for uploading the log, then tap “Start upload”to begin. The app will start uploading the selected log files to the designated server. A stable internet connection is required during the upload process. If the network signal is weak or unstable, the upload may fail or be interrupted. During the upload, the app will display real-time progress, including the amount of data uploaded, the total file size, and the overall upload percentage.


6. Wait for the upload to complete. Once the upload is successful, the app will generate a QR code for the uploaded log. Take a photo of the QR code and send it to the manufacturer's technical support team for further assistance.

7. If an error occurs during the upload process, the app will display an error message. Refer to the message to identify the issue, such as network connectivity or device settings. After resolving the problem, retry the upload.

1.4. Remote Controller Log Upload Procedure
1. Similarly, open the Huida Drone App and go to “Device management” from the home screen. On the Device Management page, select “Log service”, tap “Remote controller”, and choose the log from the corresponding time period to upload.


1.5. Charger Log Upload Procedure
1. The remote controller connects to the charger via Bluetooth. Before uploading logs, make sure Bluetooth is enabled (tap the settings button on the charger to turn on Bluetooth).

2. Open the Huida Drone App. On the main screen, go to “Device management”, then select “Charger” on the device management page.

3. Tap “Search for nearby chargers”.


4. Then return to the device management screen. The charger status will show as “Connected”. Tap “Log service”.

5. Click the charger log, then after clicking upload, send the QR code to the technical team

1.6. Battery Log Upload Procedure
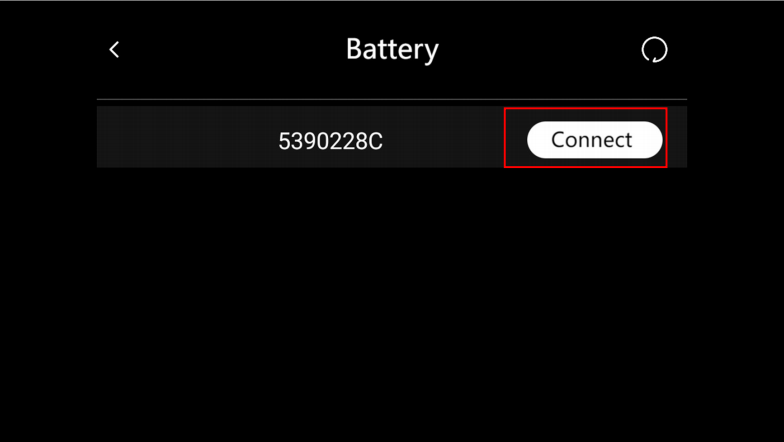
1. The battery log upload process is similar to that of the charger log. The battery must be powered on in advance and connected via Bluetooth.

2. When the Bluetooth function is enabled, you can search for the battery's serial number in the battery information interface and connect to the specific battery serial number that needs to upload logs.。
3. Enter the battery management screen and tap "UPLOAD LOG".

4. Select the logs for the corresponding time period and tap the "UPLOAD LOG" button to complete the process. Similarly, provide the QR code of the log to technical support.

1.7. Common Issues and Solutions
1. Connection Issues
(1) Unstable connection or frequent disconnection:
① Check whether the devices are powered on properly
② Check whether the battery levels is sufficient.
③ Close and reopen the app, or restart the mobile device, drone, and remote controller, then try connecting again.
④ Ensure that the distance between devices is not too great. Keep them within the effective connection range (typically around 10 meters for Bluetooth; this may vary by device).
⑤ Check for possible sources of interference in the surrounding environment, such as strong magnetic fields or other wireless devices. Move away from such sources and attempt to reconnect.
⑥ Make sure the app is updated to the latest version, as older versions may have compatibility issues.
⑦ Check whether the firmware of the drone and the remote control is up to date. If not, follow the official instructions to upgrade the firmware, then try connecting again.
2. Log Upload Issues
(1) Log Upload Failure:
① Check the network connection on the mobile device. If the connection is unstable, try switching to a different network (e.g., from mobile data to Wi-Fi or vice versa), then attempt the upload again.
② Verify whether the size of the log file exceeds the server’s upload limit. If the file is too large, try uploading it in smaller batches, or contact technical support for alternative solutions.
(2) Slow Upload Speed:
① Limited network bandwidth may cause slow upload speeds. Try uploading in an environment with a strong signal and sufficient bandwidth, such as a high-speed Wi-Fi connection.
② Heavy server traffic caused by many users uploading simultaneously may also result in delays. Try uploading during off-peak hours (e.g., late at night) to improve the upload speed.
(3) Precautions
① Before performing the log upload operation, carefully read the user manuals of both the drone and the remote control to understand the specific operating requirements and safety precautions. Improper operation may result in device damage or data loss.
② During the log upload process, ensure that the mobile device is placed in a safe and stable position. Avoid any movement or dropping of the device that could interrupt the operation or cause physical damage.
③ If you encounter any issues during log upload, do not attempt unauthorized methods or use unapproved software tools. Such actions may cause irreversible damage to the device. Contact Huida’s technical support team promptly for professional assistance and guidance.
2. Firmware Upgrade
2.1. Introduction
The firmware of an agricultural drone functions as its "brain," executing critical control instructions. With continuous technological advancements and expanding application scenarios, regularly upgrading the firmware plays a vital role in optimizing drone performance, improving operational efficiency, and enhancing flight safety. New firmware versions often fix bugs found in earlier releases, improve flight control algorithms, support new hardware components, and introduce additional features. This manual aims to provide users with a detailed, step-by-step guide to the firmware upgrade process for agricultural drones, helping them easily unlock improved performance and functionality.
2.2. Upgrade
2.2.1. Information Collection
Identify the Drone Model: Carefully check the markings on the drone body, the product manual, or the purchase receipt to accurately confirm the specific model of the drone. Firmware may vary between different models, so it is essential to perform model-matched upgrades to avoid malfunction caused by installing the wrong firmware.
Obtain Official Upgrade Resources: Under the guidance of Huida's technical support team, visit the official technical support platform to find the latest firmware upgrade package and related documentation corresponding to your drone model.
2.2.2. Device Preparation
Fully Charged Batteries: To ensure that the drone and related devices do not power off during the upgrade process, fully charge the drone battery and the remote control battery in advance. Unexpected power loss during the upgrade may cause firmware corruption and prevent the drone from starting properly.
Stable Network Environment: Network interruptions may result in upgrade failure. Ensure a stable and reliable internet connection throughout the process.
2.2.3. Environmental Preparation
Choose A Safe Location: Perform the upgrade in an open, flat, and safe area away from crowds, buildings, and obstacles, such as a large open square or an unoccupied farmland. Avoid upgrading indoors, in confined spaces, or areas with strong signal interference to prevent accidental drone activation during the upgrade, which could pose safety risks.
Suitable Weather Conditions: Whenever possible, select clear weather with little to no wind and no precipitation (rain or snow) for the firmware upgrade. Adverse weather conditions may affect the performance of the drone and related equipment, increasing the likelihood of upgrade failure.
2.2.4. Upgrade Process
(1) Download Firmware Package
Firmware Package: The firmware upgrade package is distributed by the manufacturer’s technical team as needed.
(2) Connect Devices
Drone Connection: Short press and then long press the power button on the drone to turn it on. Open the Huida Drone App, locate “Device management” on the app’s main interface, and enter it.


(3) Battery/Charger Connection: Turn on the battery or charger. Then, connect the battery or charger to the remote controller via the Device Management screen.
2.2.5. Execute Upgrade
Drone/ Remote Controller Upgrade: When the app prompts that the upgrade for the remote controller or drone is about to begin, carefully verify the upgrade version number, description of the update content, and other relevant information to ensure the upgrade is correct. After confirmation, click “Download and update” to officially start the upgrade process.


Battery/ Charger Upgrade: In the Device Management screen, tap the “Charger/Battery” icon to enter the Battery/Charger Management interface. In this interface, locate the “Detect upgrading” option and tap the “Update” button.


Tap “Upgrade” and wait for the device to complete the upgrade.


Wait for the upgrade to complete: During the upgrade process, the drone and related devices will automatically transfer data and update the firmware. This process may take several minutes to over ten minutes, depending on the firmware size and device performance. Please maintain a stable connection throughout and avoid performing any other operations on the drone or control devices, such as powering off, disconnecting cables, or closing the app. The upgrade progress will be displayed as a percentage on the app interface.
2.2.6. Post-Upgrade Check
Check firmware version: After the firmware upgrade is completed for both the drone and the remote control, verify the upgrade success by checking the version status in Device Management. A successful upgrade will display the status as “Matched”.

On the “Version check” interface, you can view the current version numbers. When the drone and remote control versions match, the text will be highlighted in green.

Perform functional testing: Conduct basic functional tests on the drone, such as a short-distance flight test in a safe area to check flight stability and control responsiveness. Test the drone’s spraying system, spreading system (if applicable), and other operational functions to ensure they are working properly. Verify that the obstacle avoidance and positioning functions are accurate and effective. If any abnormalities are detected during testing, refer to the upgrade instructions or contact technical support for assistance promptly.
2.2.7. Upgrade Precautions
(1) Avoid Interruptions During Upgrade
Continuous monitoring: During the upgrade process, closely monitor the upgrade progress and do not leave the site. If unexpected issues occur, such as device freezing or prolonged stagnation of the upgrade progress, avoid making arbitrary operations. First, consult the troubleshooting section in the upgrade manual or contact technical support for guidance.
Prevent interference: During the upgrade, avoid environments with strong electromagnetic interference, such as areas near high-voltage power lines, communication base stations, microwave ovens, and similar equipment. Strong electromagnetic interference may affect the stability of data transmission and cause the upgrade to fail.
(2) Handling Upgrade Failures
Avoid repeated attempts: If an upgrade failure occurs, such as error codes or interrupted upgrades, do not immediately restart the upgrade process. First, check that device connections are normal and the network is stable (if performing an online upgrade). Carefully review the failure messages and try to resolve the issues according to the provided instructions.
Contact technical support: If you are unable to resolve the upgrade failure on your own, promptly contact technical support. Provide a detailed description of the situation during the upgrade, including error messages and the step at which the upgrade failed. This will help technical personnel accurately diagnose the issue and offer solutions. Follow their guidance for any further upgrade attempts.
(3) Data Backup and Recovery
Backup important data: Before upgrading, be sure to back up important data stored on the drone, such as field information. These data may be lost during the upgrade process, and having a backup ensures they can be restored if needed.
3. Conclusion
Firmware upgrades are an essential measure to enhance the performance of agricultural drones and maintain their optimal operating condition. By strictly following the pre-upgrade preparations, standardized upgrade procedures, and important precautions, users can safely and smoothly complete the firmware upgrade and fully enjoy the benefits brought by the new firmware version. If any doubts or uncertainties arise during the upgrade process, it is always recommended to follow the guidance of technical support personnel. Continuous optimization of the drone’s firmware will bring higher efficiency, more precise operations, and greater reliability and safety to agricultural plant protection tasks.。