.png?height=120&name=Pegasus%20Robotics%20Logo%20-%20Portait%20(2).png)
Introduction to the LNT
Overview

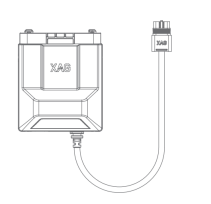
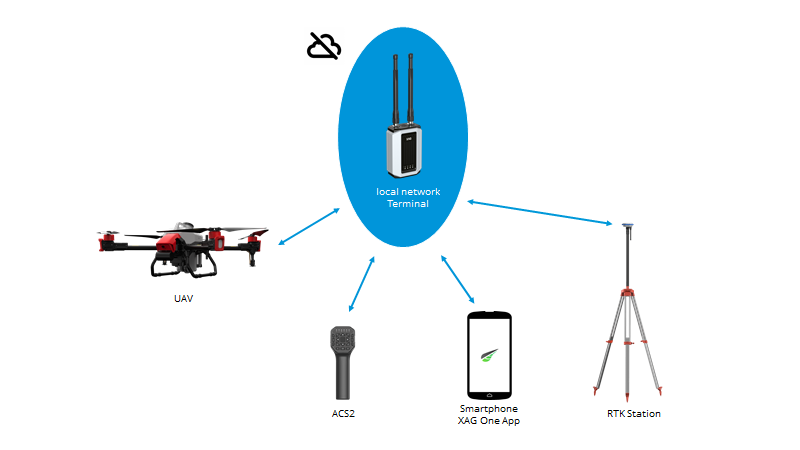
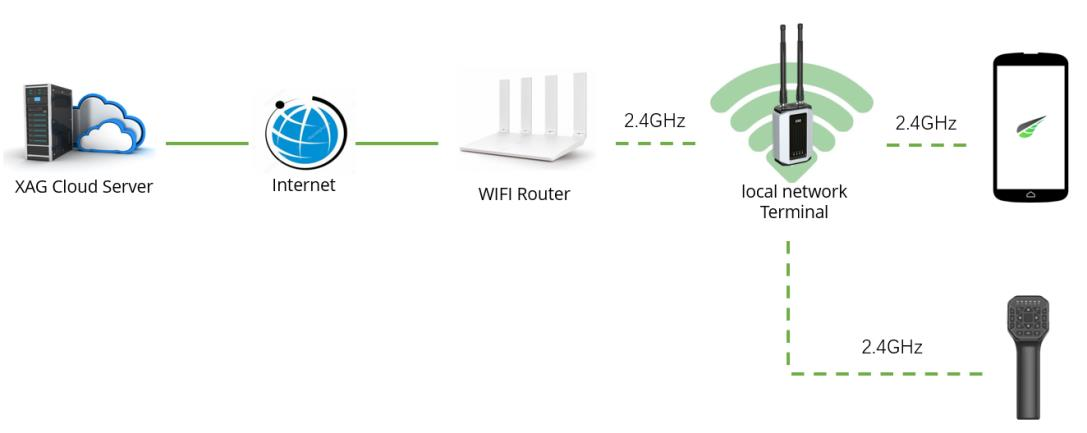
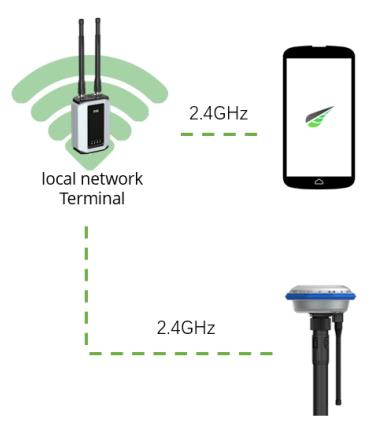
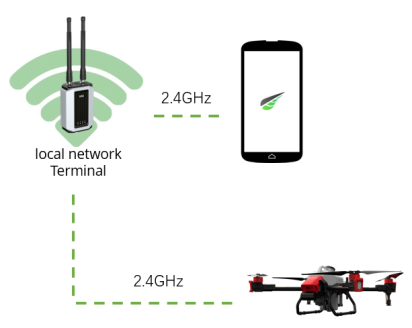
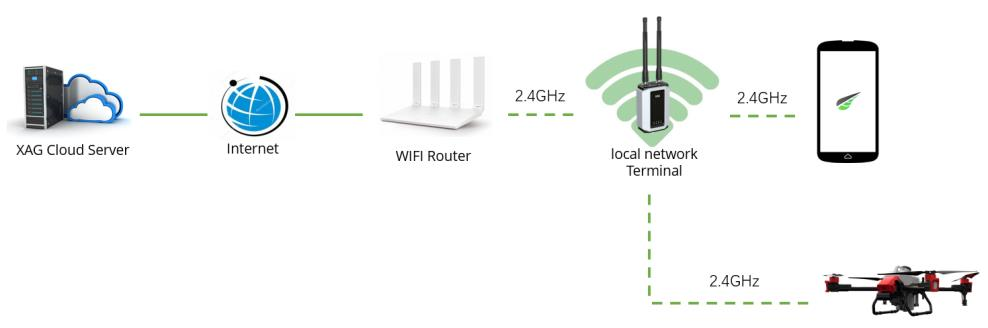
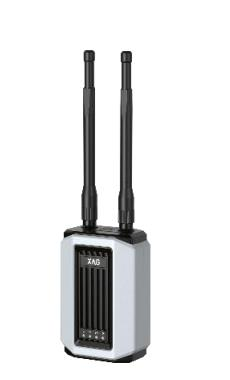
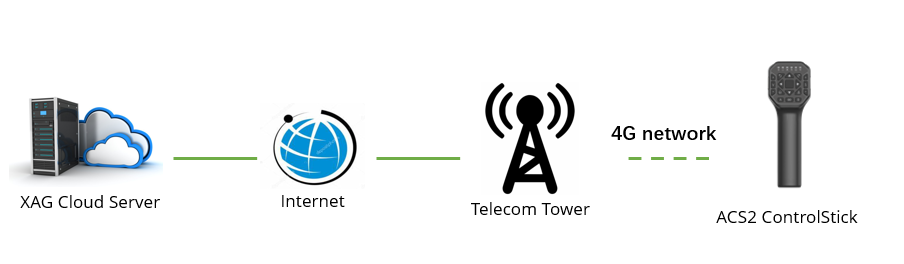
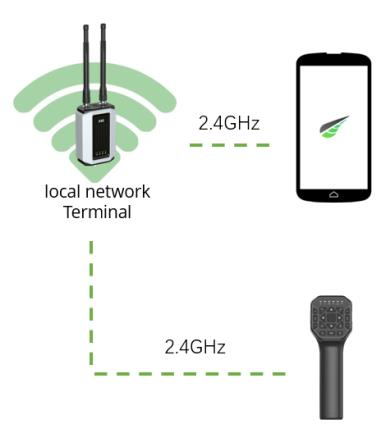
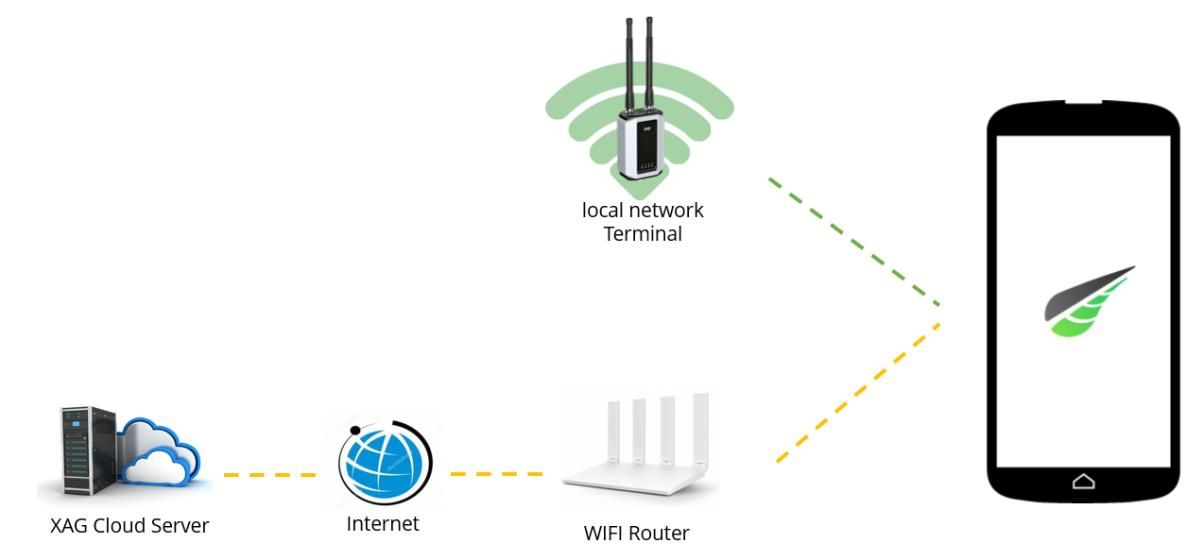
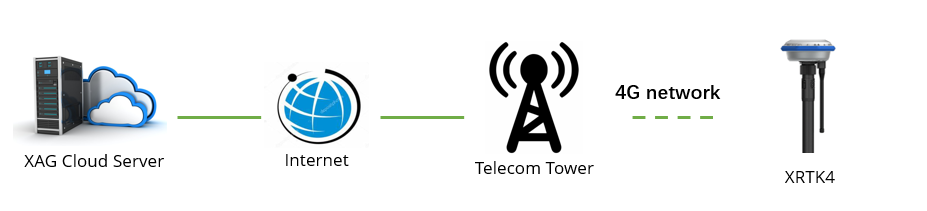
Local network terminal, abbr, LNT, works as a local IOT server that enables the wireless local area network. LNT can be the substitution of the cloud Server. It allows the communication among all the remote devices without the access of Internet, LNT and its IOT devices must be properly upgraded and configured before use.
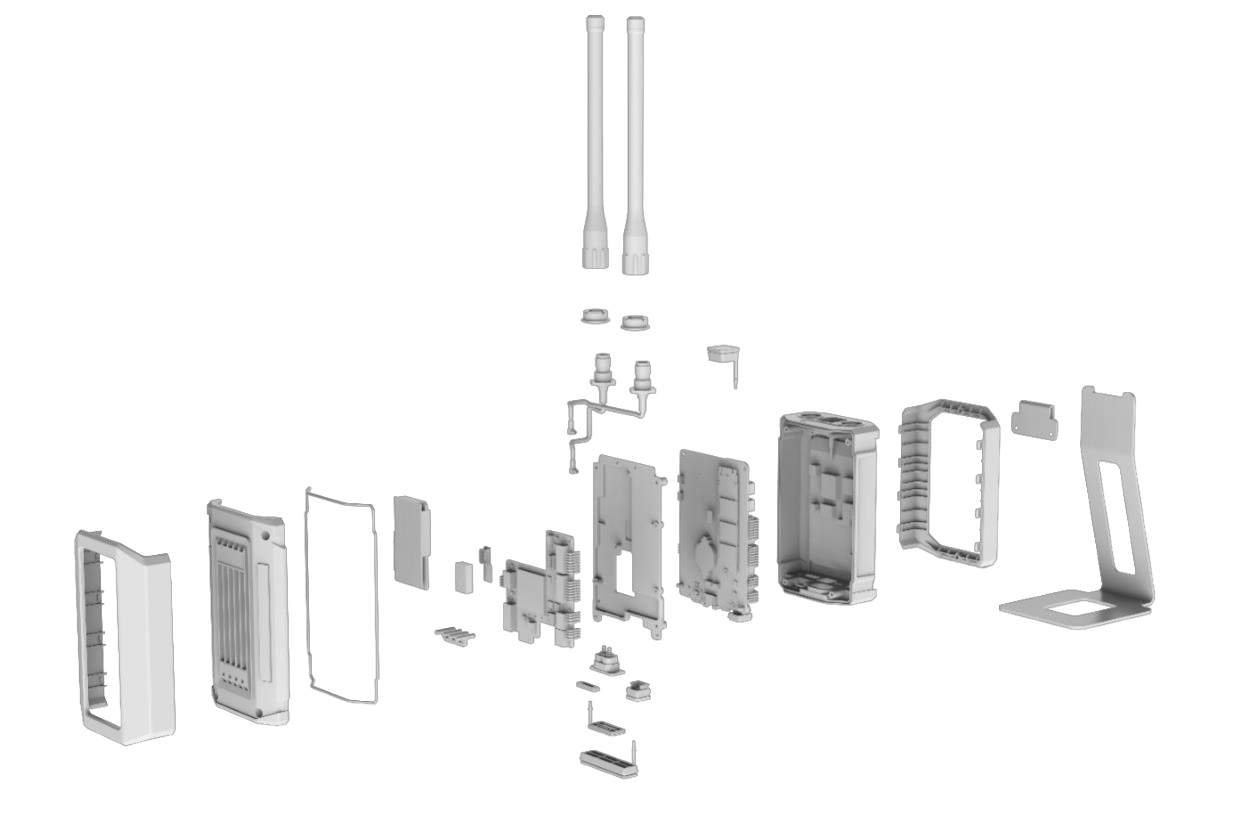
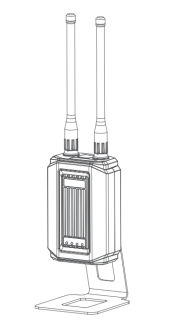
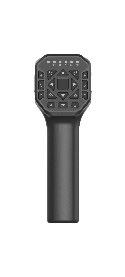
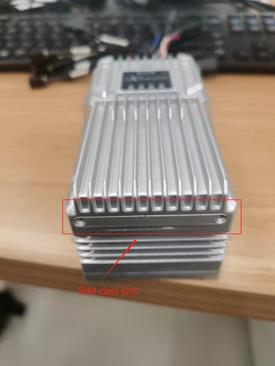
The exploded view of LNT:
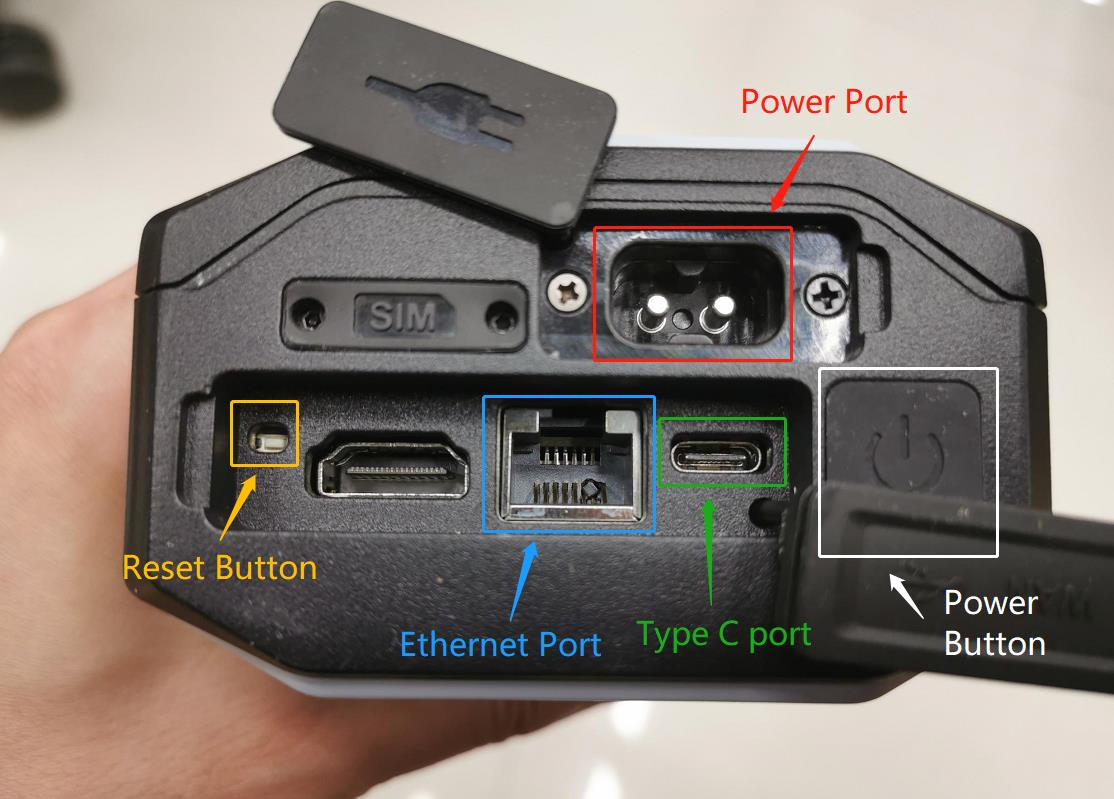
LNT port and button
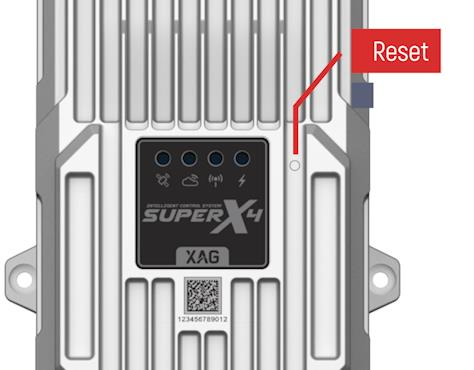
Reset Button: Use for setting recovery (forget password) and factory reset
Power Button: turn on/off LNT
Type C Port: use for firmware update
Ethernet Port: use for data transmission
Power Port: 12V/3A
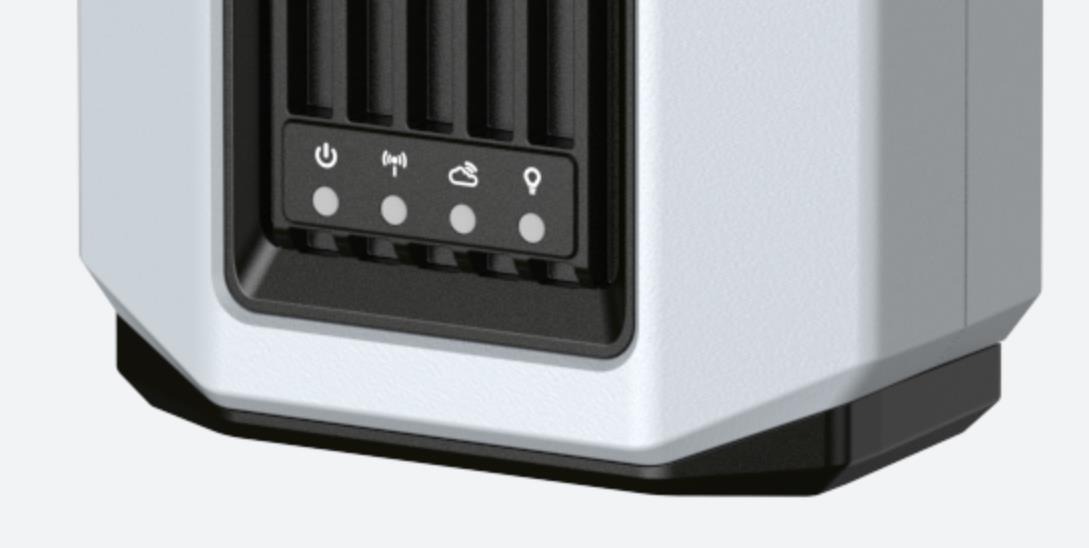
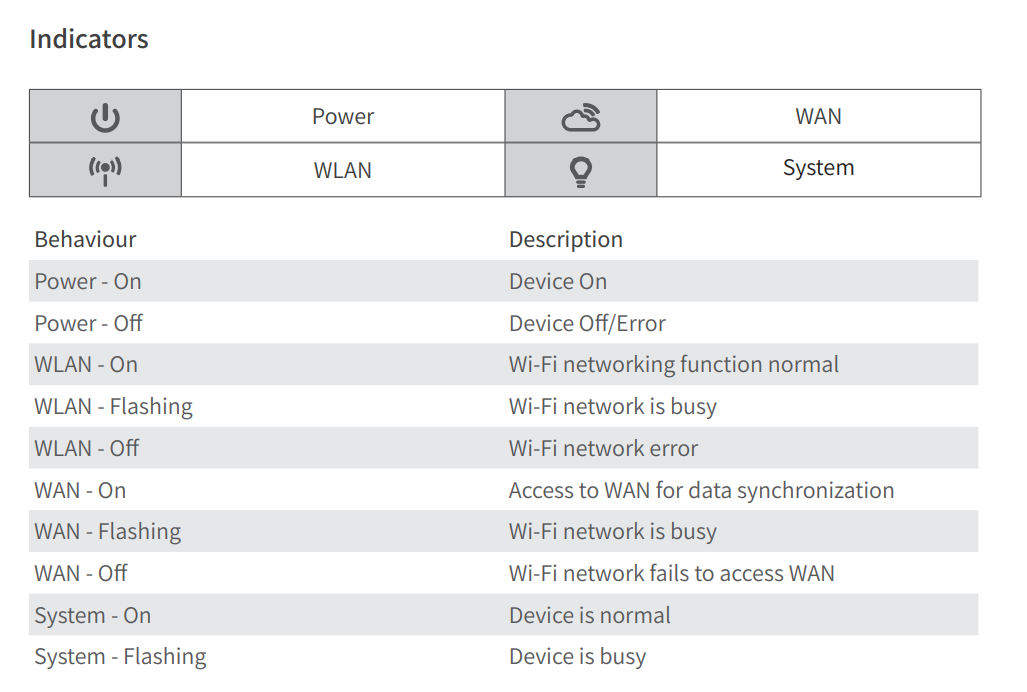
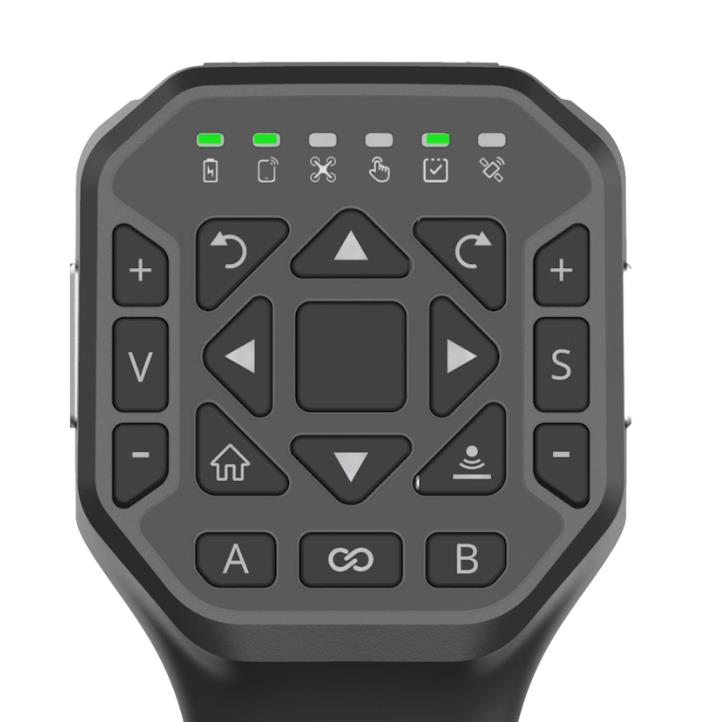
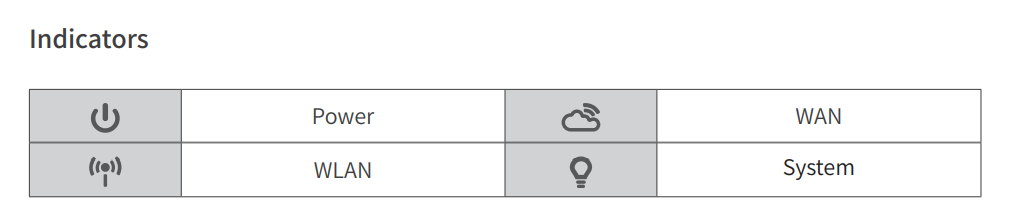
LNT LED Light Indicator
Turn On/Off LNT
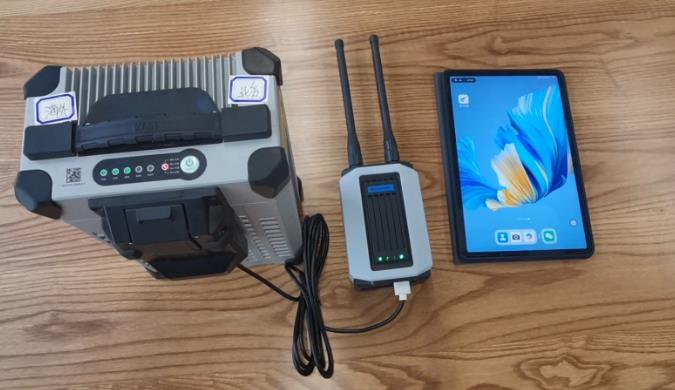
Connect LNT to power supply, either B13960S or wall charger.


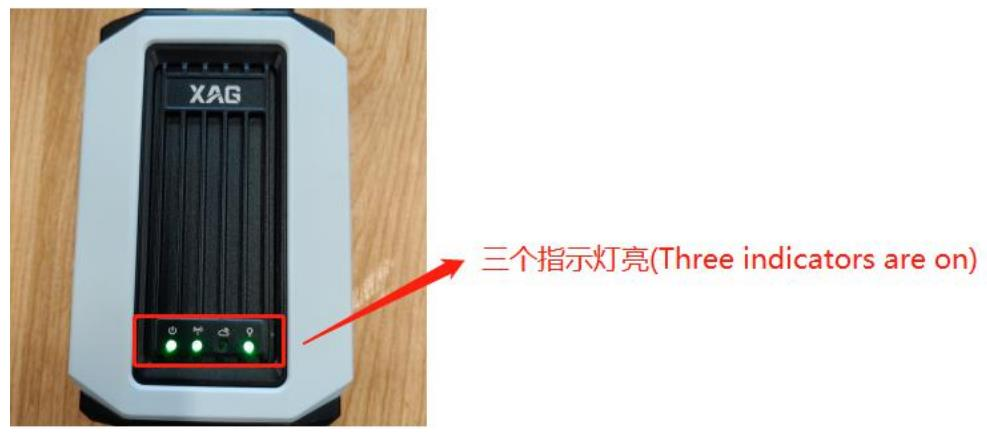
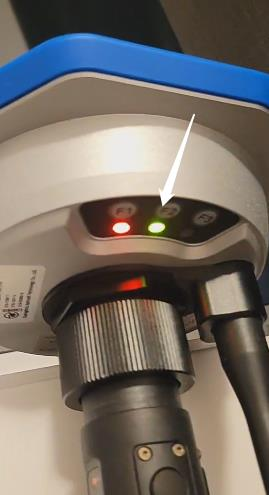
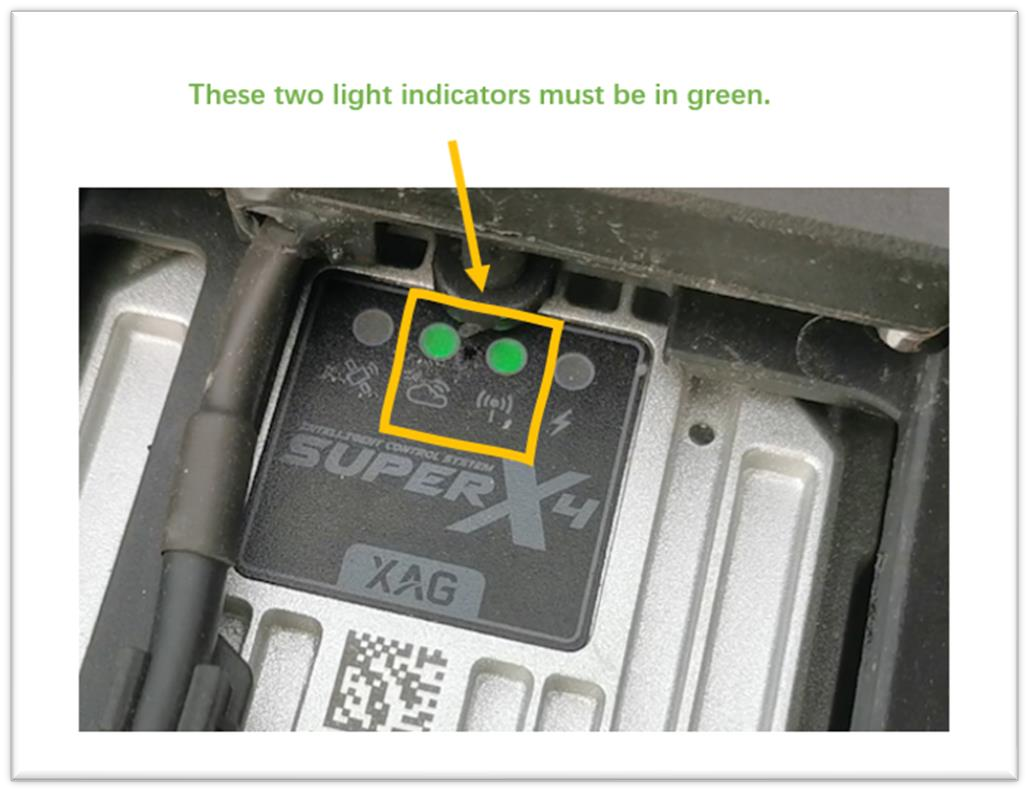
Turn on LNT: Long press power button for 2 seconds, release the power button when the 1st light indicator (Power) illuminates in green. Wait for 1 minute. The LNT is under initialization when 2nd / 3rd / 4th light indicators (WAN/WLAN/System) are flashing. Once all the light stop flashing and illuminate in green, the LNT is ready to use.
| Light | Indication | LED light | ||
| Flashing green | Illuminate in green | Become dim | ||
| No. | ||||
| 2 | WLAN | initializing | OK | malfunction |
| 3 | WAN | initializing | OK | malfunction |
| 4 | System | initializing | OK | malfunction |
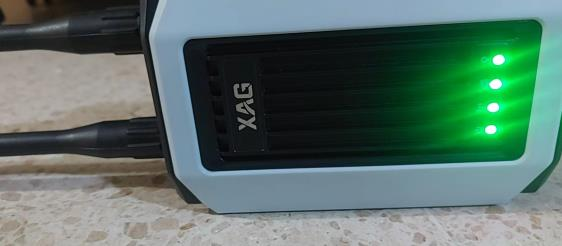
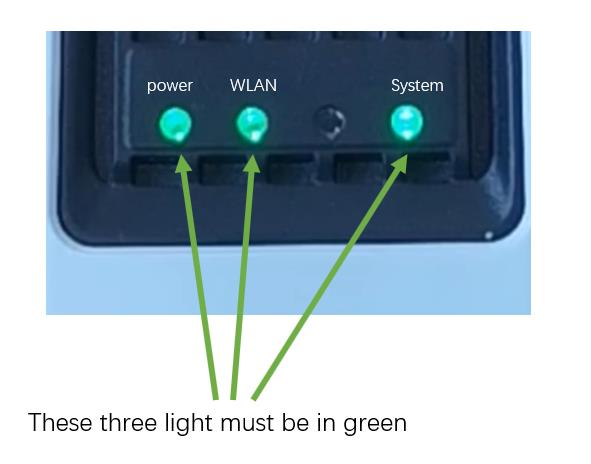
When LNT turn on successfully
| Light indicators | Photo | Do LNT turn on |
| illuminate in green |  |
successfully? |
| Power/WLAN/System | Yes |
Turn off LNT: Long press power button for 2 seconds, release the power button until other three light indicators are flashing. Wait for 5~30 seconds until all the light indicators become dim. The LNT is turned off successfully.
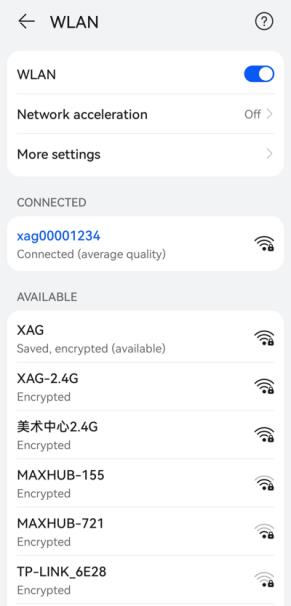
LNT hotspot
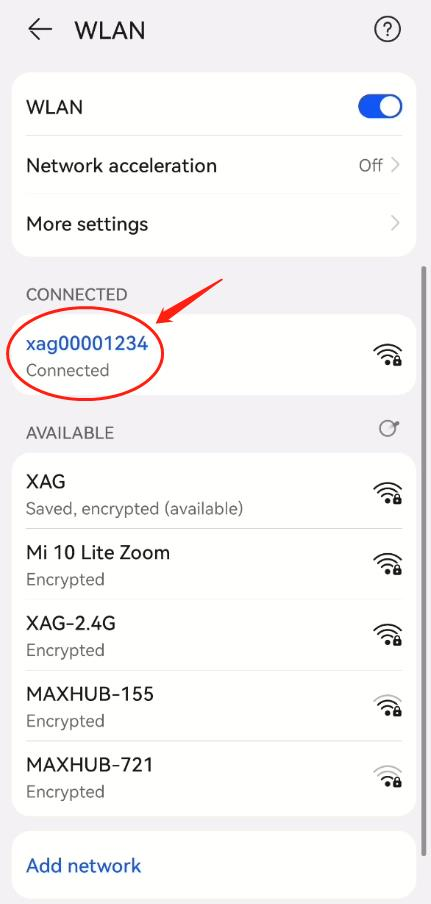
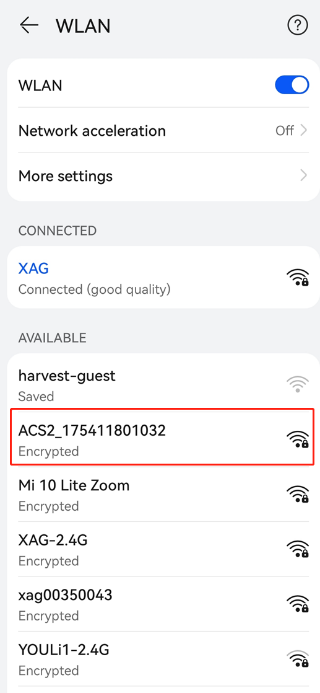
Hotspot name: XAG-XXXX, where XXXX is the last four digit of MAC address.
MAC address can be found on outer case
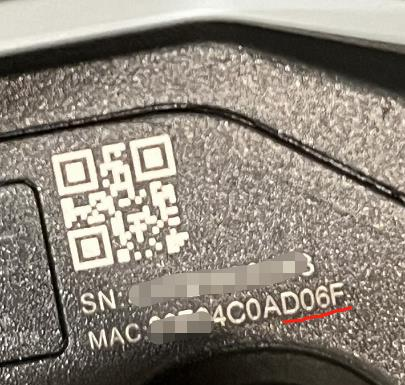
Hotspot password: 20070401
Configuration website: www.iotlogin.com
Website password: 20070401
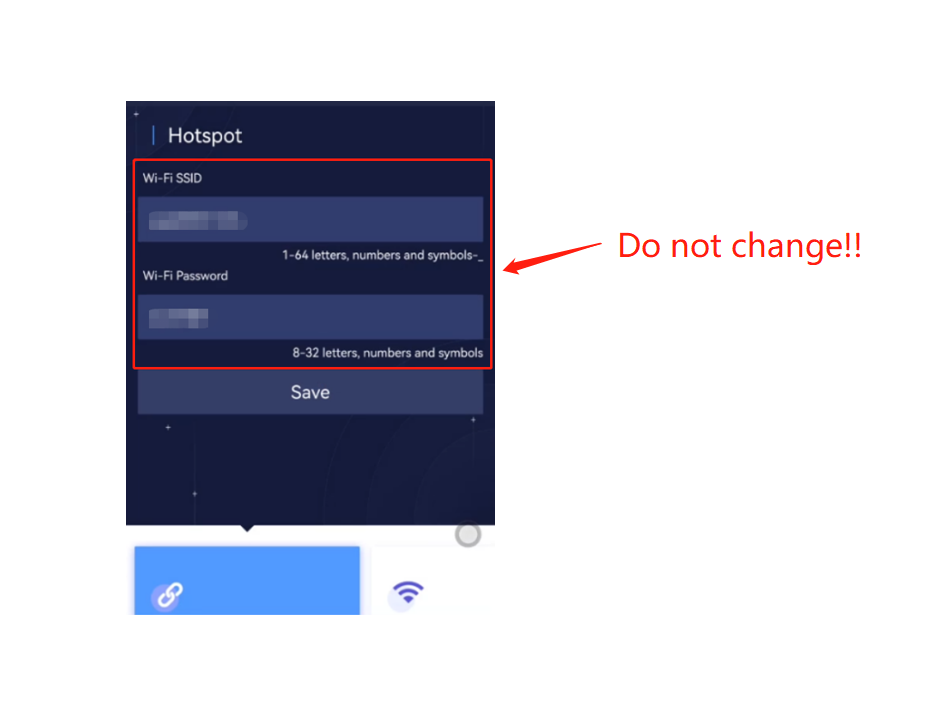
Unless necessary, please do not change hotspot name and password.
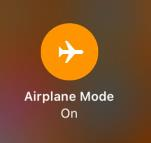
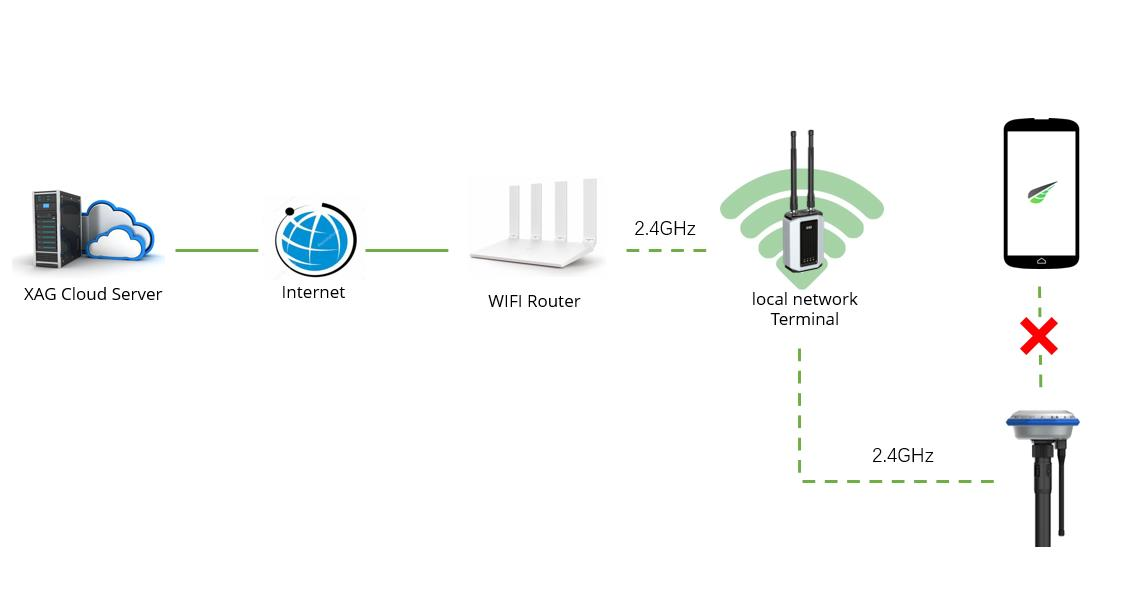
Make sure your smartphone has the flight mode enabled.
Firmware version
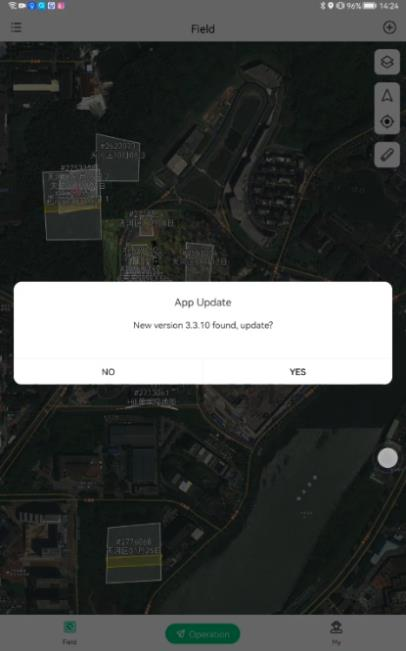
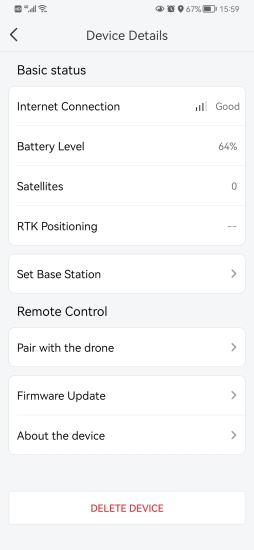
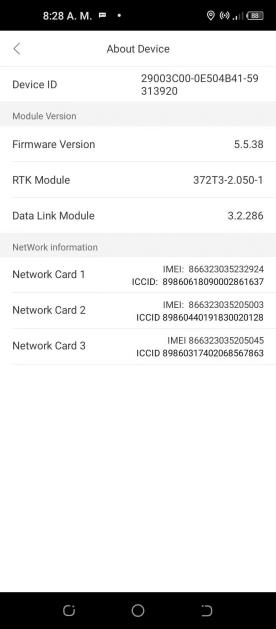
Go to “About Device” and check LNT firmware version.
 Due to the regular firmware update of LNT, please consult your XAG technical support staff for the latest firmware version.


LNT firmware version download link: please refer to Appendix I
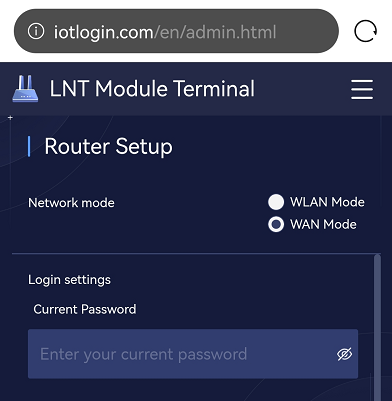
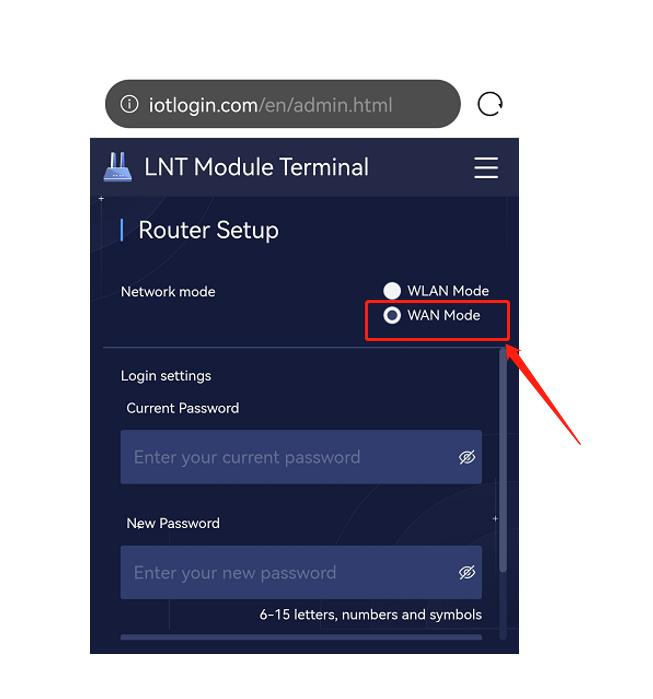
 Please be aware of that the LNT firmware above V1.0.0.31 will automatically enable
the WLAN mode when the LNT is turned on. To access to internet, users must manually turn on the WAN mode.
LNT Offline Update by USB Flash Drive (Recommended)
Preparation
| No. | Item | Description |
| 1 |
Local network terminal, abbreviation short form,LNT |
 |
| 2 |
LNT to B13960S Power Cable |
 |
| 3 |
B13960S Smart Battery,fully charge before use |
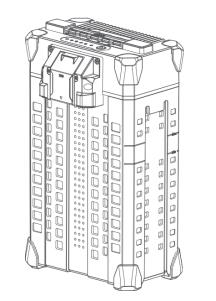 |
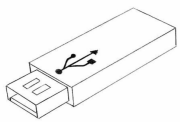
| 4 |
USB Flash Drive( memory > 4GB,FAT32 format) |
 |
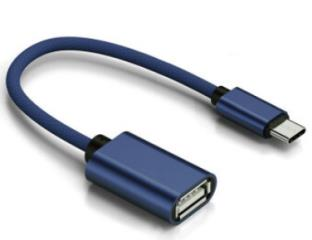
| 5 |
OTG Type-C Cable |
 |
Operating Procedure:
- Download firmware update file image.des.3;
- copy the firmware file (image.des3) under the USB flash drive root directory.
If the des file is misplaced or using zip format, the firmware update will fail to start.
Format or change the USB flash drive if necessary.
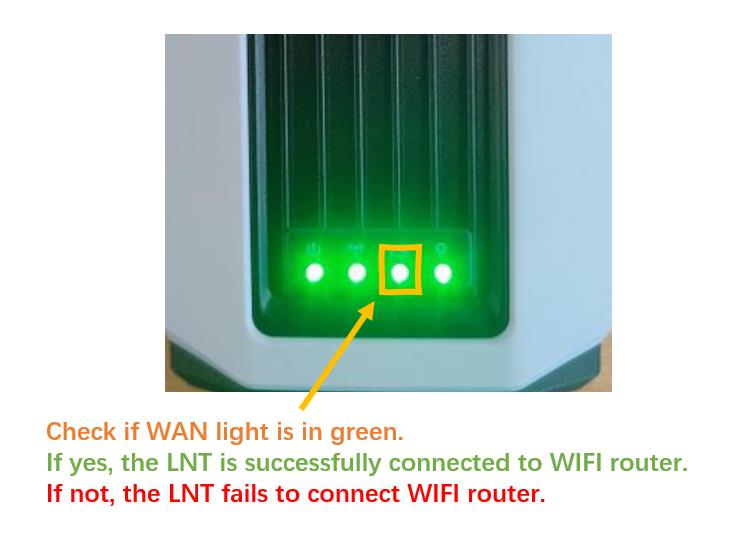
Power up LNT device,wait until all the LED indicators illuminate and stop flashing; LNT is successfully initialized if the LED indicator of Power, WLAN, System illuminates while that of WAN become dim.

Connect USB flash drive to LNT through OTG Type-C Cable/adaptor


Wait for approximately 10s until LNT firmware update begins; Meanwhile, the LED indicator of system is flashing; Please do not move the devices during the update process, otherwise cable connection may be loosened. If the system light become dim, it means the update process fail.
Wait for approximately 15 minutes, LNT firmware update is successfully completed if all the LED indicators stop flashing; Power, The LED of WLAN, System illuminate in green, but the LED of WAN become dim.
Unplug USB flash drive, restart LNT
To check your LNT firmware version. Connect your smartphone to LNT hotspot, open smartphone’s browser, go to the local website of LNT configuration http://www.iotlogin.com. The factory password is 20070401. In the configuration page, you will find the firmware version.
Done
Get LNT firmware update log
If you are facing firmware update failure or LNT malfunction, you can get the LNT firmware update log from USB flash drive, where firmware file is put. The firmware update log is named as ”ota_update.log”.
Here is an example of update log.
[ERR] UPDATE
{"status":"OK","version":{"total":"1.0.0.29","host_update":"v1.0.19","xiot_os_api":"1.6.1","web-s
erver":"V1.2.39","iot-dev":"1.0.4","wifi_firmware":"V3.22.1.36","rpe":"1.0.25","iot-server":"0.0.43
","rtk-server":"1.0.20220926","app-server":"0.2.01.16","app-collect":"0.20220923.120000","ruitu
":"overseas-0.2.02","firmware-center":"V2.3.2.1","firmware-center-config":"V1.1.0.0","upgrade-s
ystem":"0.1.0.7"}}
Sat Dec 3 14:05:11 CST 2022
You can forward XAG technical support the log for further analysis.
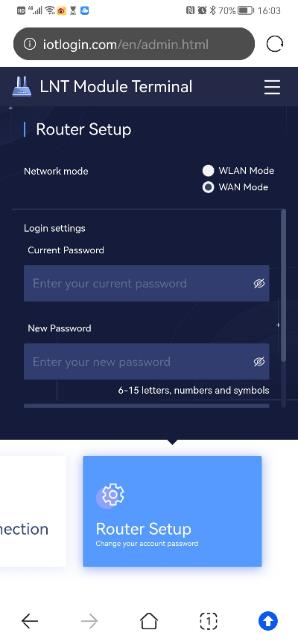
WLAN/WAN mode
WLAN mode = working mode, only use for flight missions.
WLAN is not allowed to access internet and is enabled after every LNT startup.
|
Default setting: Enable after every startup |
Internet Access |
Usage |
Network |
|
|
WLAN mode |
Yes |
No |
Flight mission |
LNT local network |
|
WAN mode |
No |
Yes |
Data sync LNT network configuration and setup |
LNT local network + internet |
Thus, if you want to have LNT access to internet, you must enable the WAN mode manually every time your turn on LNT.
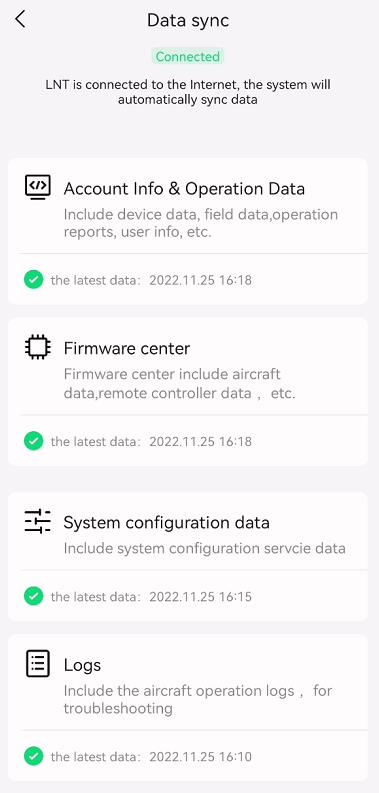
Data Sync (Auto)
LNT is required to sync with XAG cloud server regularly. Once LNT is connected to internet, data sync will happen automatically.
Make sure you select WAN mode and connect LNT to WIFI router
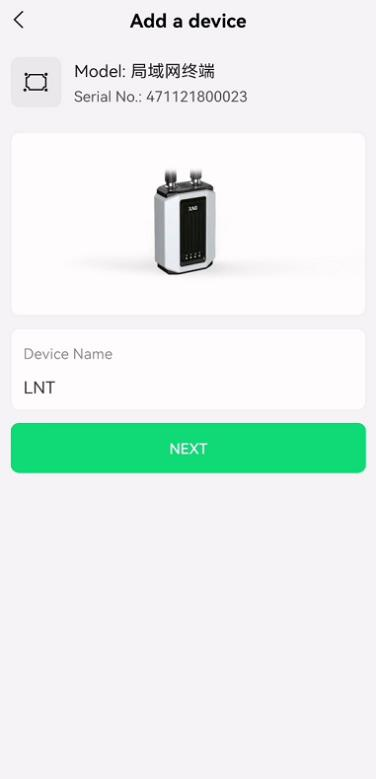
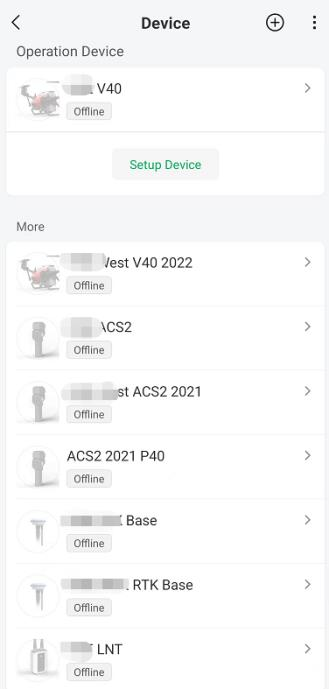
add the LNT in your device list


Name your LNT
Go to Device →LNT →Data sync


Wait for a while until all the items are synchronized.
Make sure that firmware center completes sync before update devices firmware.
Q&A
Question: What is LNT data synchronization?
Answer: Once LNT connect to internet, LNT allows the data traffic with XAG cloud server. It automatically backups, or download the data of field, flight routes, devices information download if these data are uploaded previously.
Question: What data will not be downloaded in LNT data sync?
Answer: Operation records is not allowed to download from cloud to LNT because the data may occupy a large amount of disk space and it may take for a long time to sync. If you want to read the operation records, you can either
- directly connect your App to WIFI or 4G
- website https://dservice.xa.com/
Question: Can we still read the operation records on APP when linked to LNT?
Answer: Yes. Under LNT networking mode, the operations records will be generated in LNT after flight mission. These operation records will be stored in LNT permanently unless the space reaches it limit or being deleted manually. But if
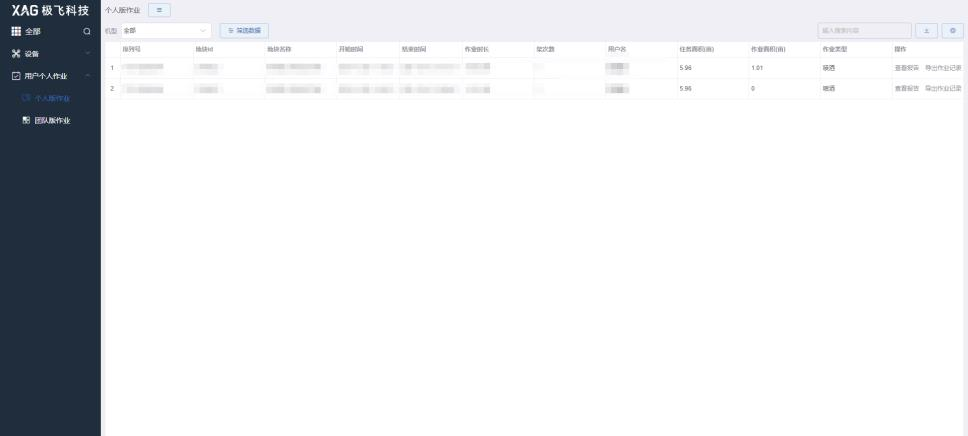
Question: where can I find my operation record? Answer:
App -> Me – individual Personal Records

website, https://dservice.xa.com/
Question: Can I still find my operation record after LNT factory reset?
Answer: If your operation records have been uploaded, you can find the operation data
- When your smartphone connects 4G network or office WIFI, you can view records on App
- go to website https://dservice.xa.com/
if your operation records did not upload to cloud server before factory reset, the records along with other data in LNT will be lost permanently.
Question: How can we run LNT data synchronization?
Answer: Simply connect your LNT to internet. Make sure LNT’s all four lights indicators are illuminated in green.
Question: Should we sync LNT with APP?
Answer: Yes, you can do that. you can connect your smartphone to LNT and leave your App open for 2- 5 minutes.
Question: When do we run LNT data synchronization?
Answer: LNT newly received or after daily operation.
Question: synchronization happen while using fixed station?
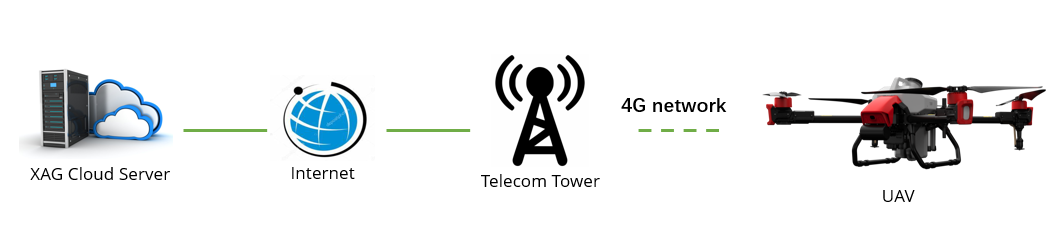
Answer: Fixed station is used under 4G network. LNT only works with portable station.
Question: How often is LNT data synchronization?
Answers: it’s suggested to sync after daily operation. or, depends on your habit, update once or twice a week.
Question: Is there a way of monitoring the synchronization process?
Answers: Yes. Add LNT to your device list, then you are able to monitor the process.
Question: Do I need to manually activate data synchronization?
Answers: No, you don’t. It’s fully automatic.
Question: Does LNT have wall charge? I don’t want to use battery to sync my LNT in office.
Answers: Please feel free to ask your sales representative regarding to the LNT wall charger, PN 05-002-01648. This accessory is very useful when you work with LNT in office.


Setting Recovery (forget password)
Long press reset button for 3 seconds. Release the button soon after the 4th light indicator (system) is flashing. Wait for 60 seconds for setting recovery. Once the 4th light indicator illuminates in green, the setting recovery is completed.
UAV/XRTK4/ACS2 Firmware update under LNT Networking Mode
LNT can support the firmware update of ACS2 remote controller, XRTK4, and UAV (P40/V40/P100).
Make sure sync LNT or connect LNT to internet before firmware update.
Factory Reset
Turn on LNT. Long press the reset button, the 4th light indicator is flashing after three seconds, ignore it, and keep pressing the reset button for approximately 12 seconds until the 2nd time the 4th light indicator is flashing. Quickly release the reset button. The LNT will start to reset. This whole reset process will take approximately 30 minutes. During reset, the 4th light indicator remains flashing. Once completed, the 4th light indicator illuminates in solid green.

After factory reset, the LNT SSID and password will revert to the factory setting. If the LNT SSID and password are changed, it’s necessary to do the LNT networking configuration again.
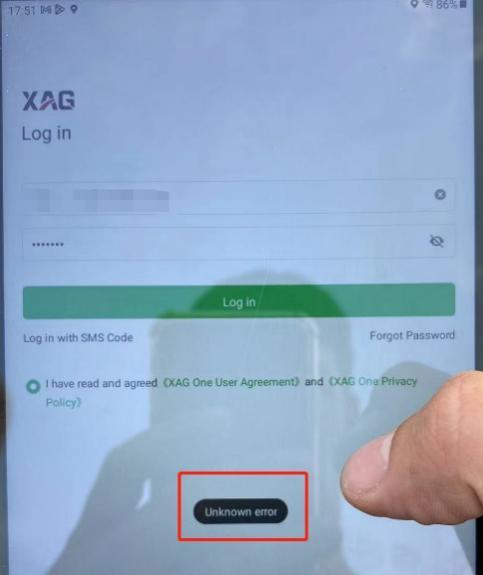
Factory reset will remove all the user data in LNT. Thus, after factory reset, please connect LNT to internet and login your account. Once account login, LNT will sync the user data from XAG cloud server.
Otherwise, you may receive unknown error when login account offline
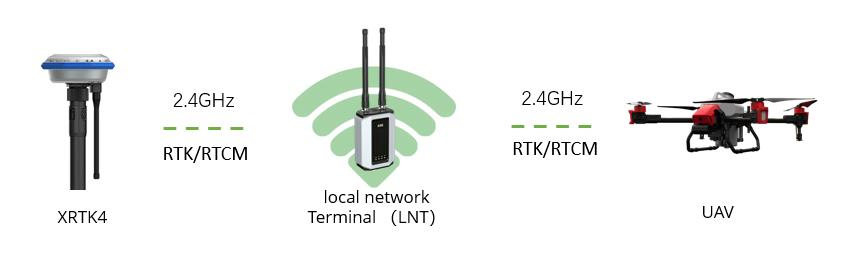
LNT Communication Range Limitation
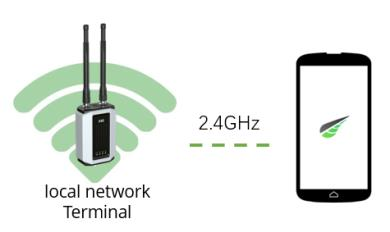
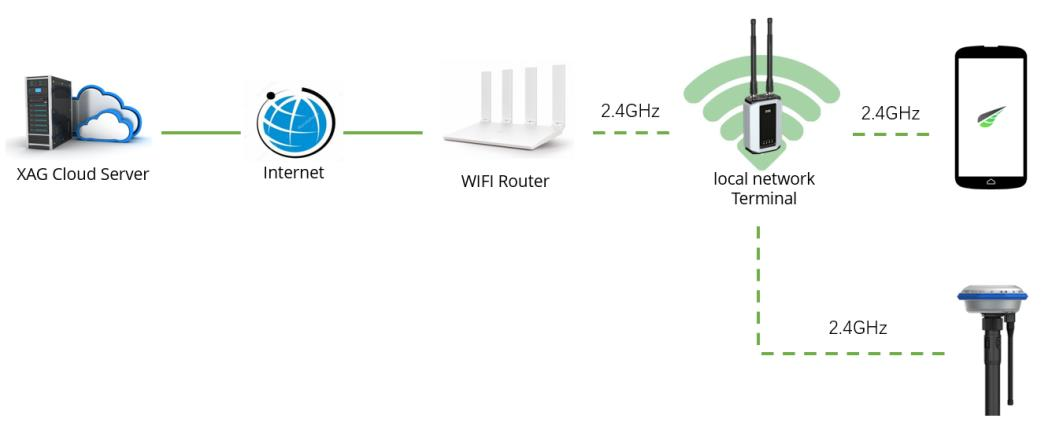
Local Network terminal (LNT) acts as a local IOT server that enables the wireless local area network. It allows the communication among all the remote devices without internet. The local network use 2.4GHz radio frequency to transfer data/commands wirelessly.
| Pair | CE (max.20db) | FCC (max.30db) | Comments |
| LNT - UAV | 400m | 800m | |
| LNT - ACS2 | 400m | 800m | |
| LNT - XRTK4 | 400m | 800m | |
| LNT - Smartphone | 100m | 200m | use ACS2 as repeater, connect Smartphone to ACS2 for functioning distance enhancement |
If your antenna is broken, please replace the LNT Antenna according to the requirements:
- 2.4GHz
- TNC-J male connector

More than 4DBI (obey the local laws or regulations)
Who can operate the configuration and setup process?
Due to the complexity, only authorized distributors are allowed to configure and setup LNT networking mode.
 Important Notice: Be cautious of removing devices from LNT network
Sometimes the network delay issue may be causing trouble when removing devices under LNT networking mode, and next cause the failure of adding the device. This network delay is due to the long communication distance between user’s location and XAG cloud server based in China. Thus, please do not remove devices unless you must.
LNT Network Configuration Method One – “Configure WIFI Before Join”
Step 1: Preparation
| No. | Item | Description |
| 1 |
UAV (model 2021/2022) |
 |
| 2 |
ACS2 2021 remote controller |
 |
| 3 |
XRTK4 Portable Base Station |
 |
| 4 |
Local Network Terminal (LNT) |
 |
| 5 |
Android/harmonious OS Smartphone |
 |
| 6 |
WIFI Router or Smartphone's hotspot that can access to internet |
 |
Notice
All the devices’ batteries must be fully charged
All the devices must be powered up normally
Device registries in App account requires the internet access to XAG Cloud Server, where device registry data will upload to cloud server. Thus, you shall complete the LNT setup in the places where it has good internet condition.
Step 2: Update LNT/ACS2/XRTK4/UAV Firmware to the Latest Version
Very important: Please update the UAV/XRTK4/ACS2/LNT firmware to the latest version!
It’s highly recommended to update UAV/XRTK4/ACS2 firmware using either 4G or LNT.
More than 50% of LNT configuration issue is due to the facts that the operators forget to update firmware.
- Update LNT firmware
- Update ACS2 firmware.
- Update XRTK4 firmware.
- Update UAV firmware.
If you don’t know how to update firmware, please go to the section of “firmware update”. Since one device (ACS2, XRTK4, UAV) can be only added by one account. Thus, it’s suggested to remove the devices from account after online update.
Step 3: Connect LNT to internet through WIFI Router
Objective: Connect LNT to WIFI Router, allowing LNT to access internet

Procedures:
Obtain local WIFI Router's SSID and password

Power up LNT
Wait for a while until the Power, WLAN and system light indicator illuminate; Meanwhile, WAN light indicator becomes dim

Connect your smartphone to LNT's hotspot

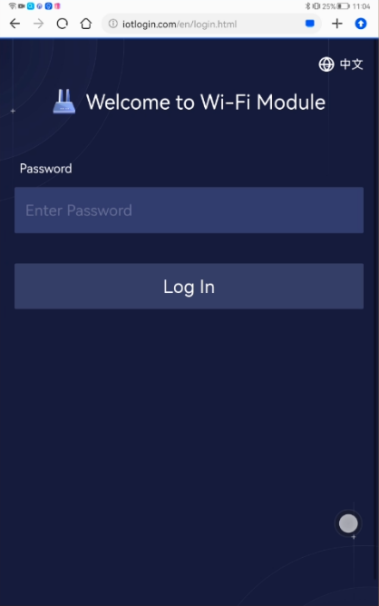
Open your smartphone's browser, input the LNT web address, http://www.iotlogin.com
Input password “20070401”

Remember the WIFI-SSID and password. Do not change them.

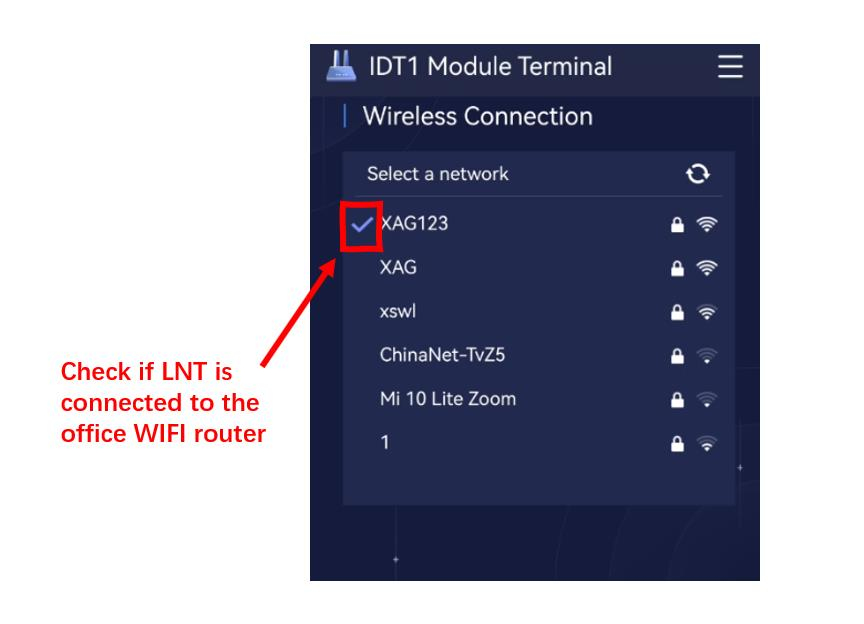
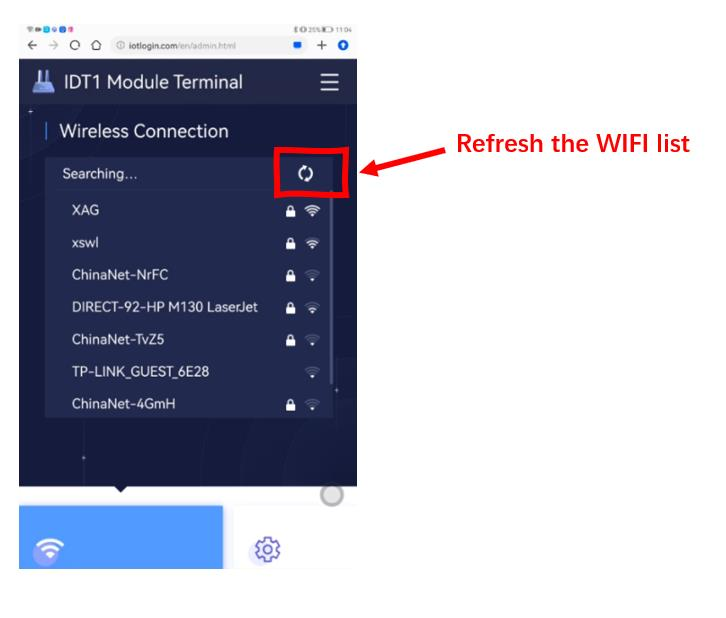
Go to Wireless Connection;Choose the SSID of local WIFI
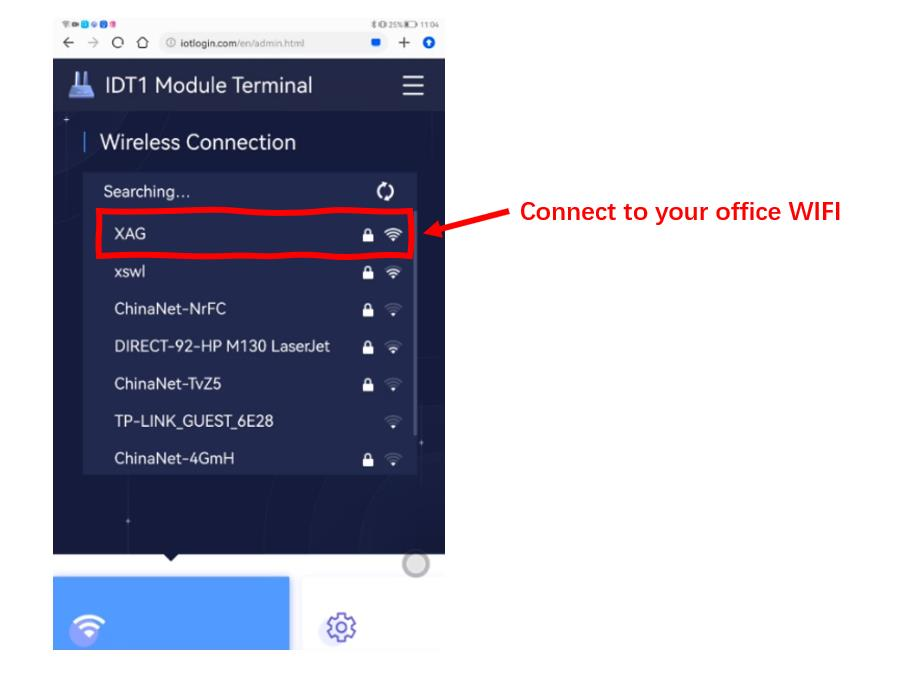
Notice: press  to refresh the list if your WIFI router SSID is not shown

Input WIFI router password and press "Join"
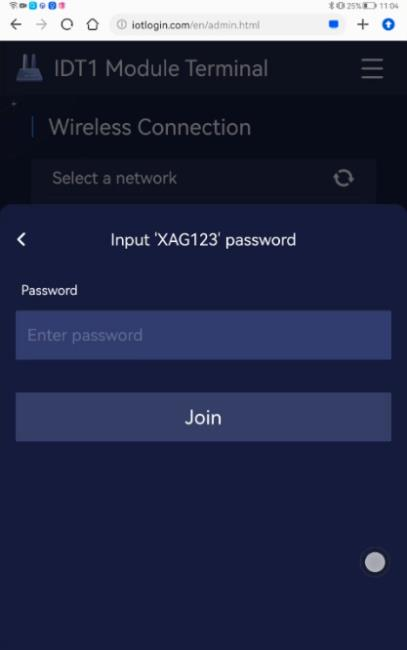
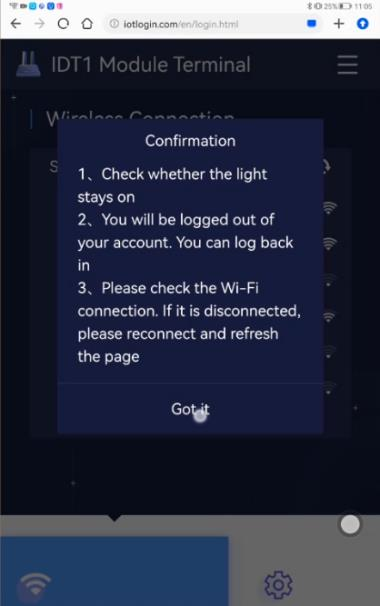
Press "Got it"

Check WLAN connectivity. Go to LNT web page ➡Wireless Connection, check if your LNT is connected to the office WIFI router.
Check the LNT WAN light indicator.
LNT now has internet access. Please test it by browsing any websites, for example XAG official, Google, Facebook, etc..

Step 4: Configure ACS2 WIFI Access
Objective: Configure ACS2 WIFI Access. Once configured, ACS 2021 will automatically connect to LNT hotspot.

Procedure:
Power up ACS2

Optional: To eliminate the influence of 4G and make sure that ACS2 WIFI hotspot is enabled, we can REMOVE the SIM card
Wait 60 seconds until the ACS2 2021 completes initialization. Once completed, the third
light indicator will stop flashing and becomes dim.

Connect your smartphone to LNT hotspot. Make sure LNT is connected to internet.
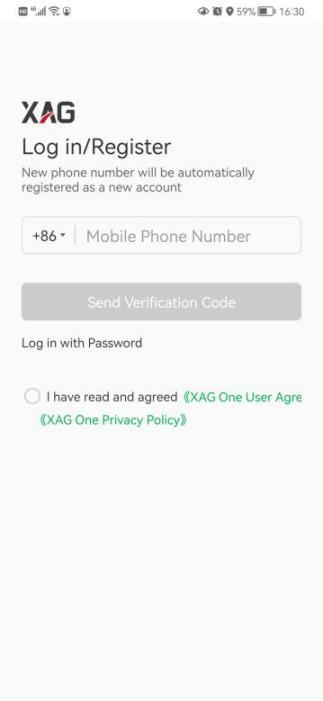
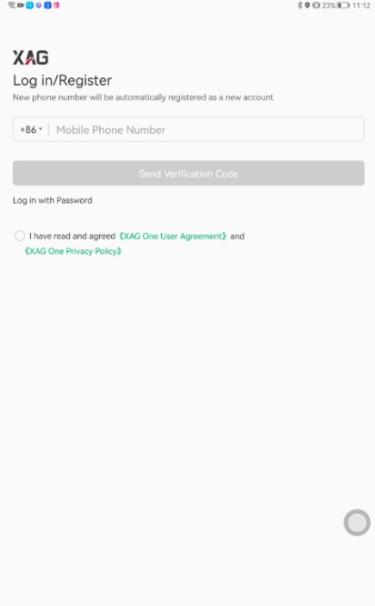
Open XAG One App, and sign in your account.
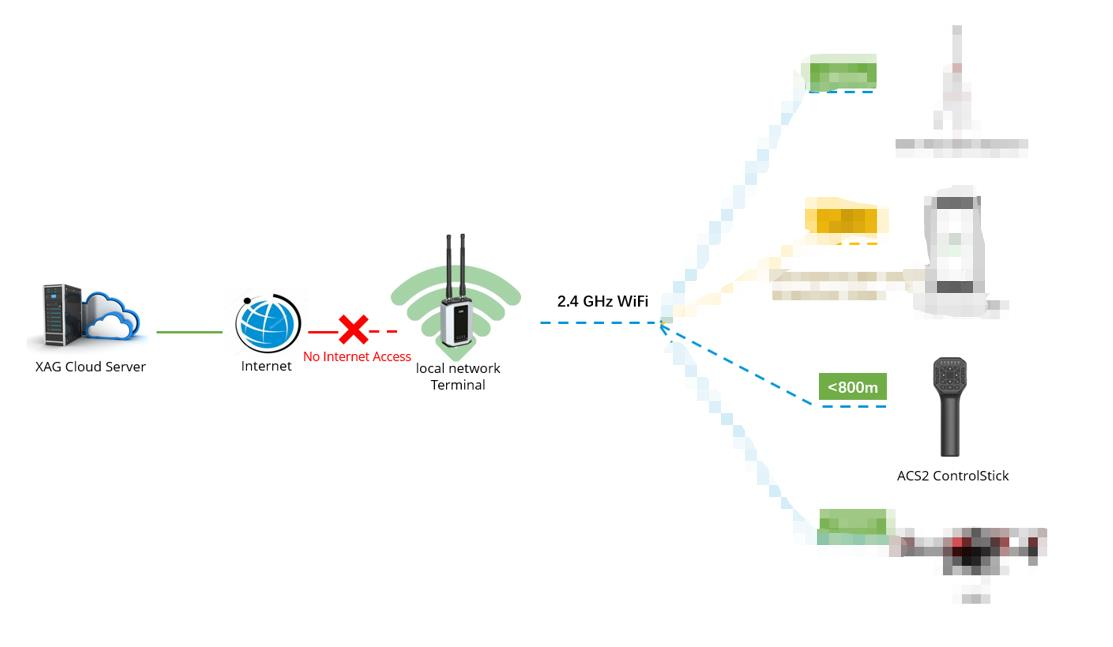
 Attention: Local network terminal, LNT, is a fake cloud server. When the smartphone is connected to LNT, the App account will log in LNT-side server. If LNT has internet access, it will automatically sync with XAG cloud-side server. Oppositely, when the smartphone is connected to 4G, the App account will directly log in Cloud-side server.

Go to  ➡
➡  ➡
➡ ➡
➡ ➡
➡


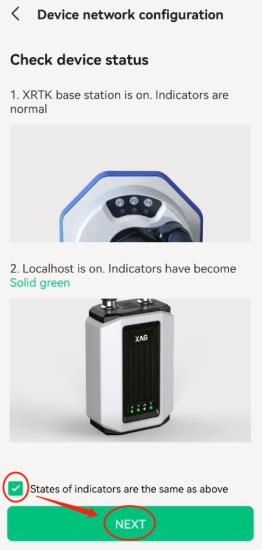
Check device status.
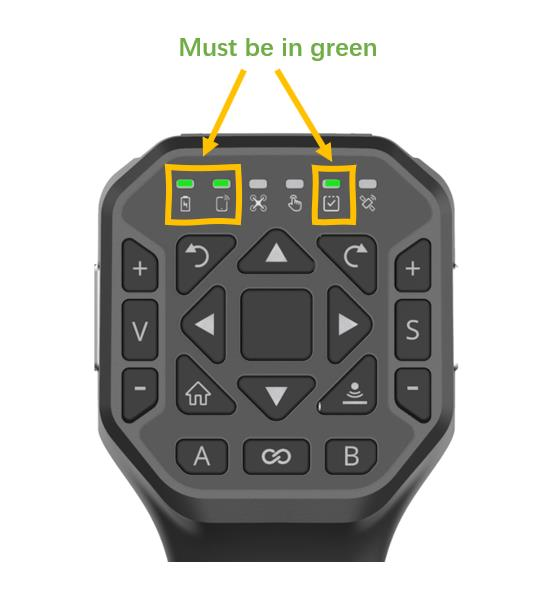
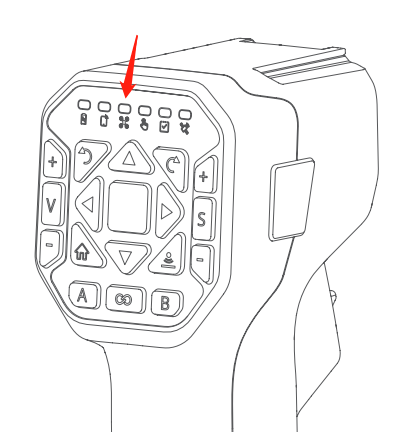
Make sure the 1st light indicator of ACS2 2021 is in green. Make sure all four of LNT light indicators are in green.

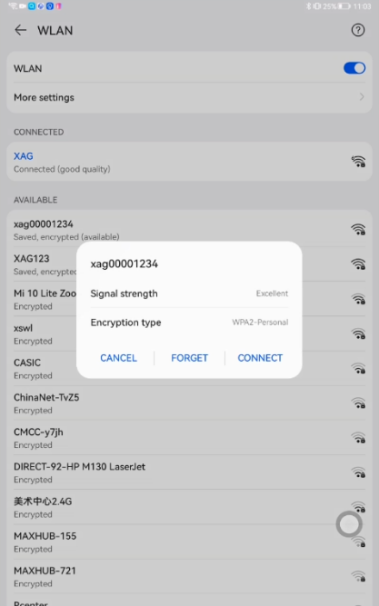
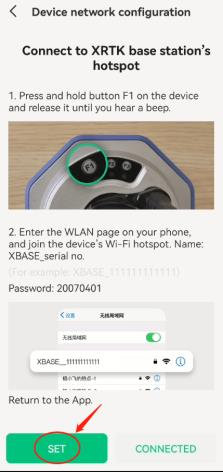
Press the green button “SET”
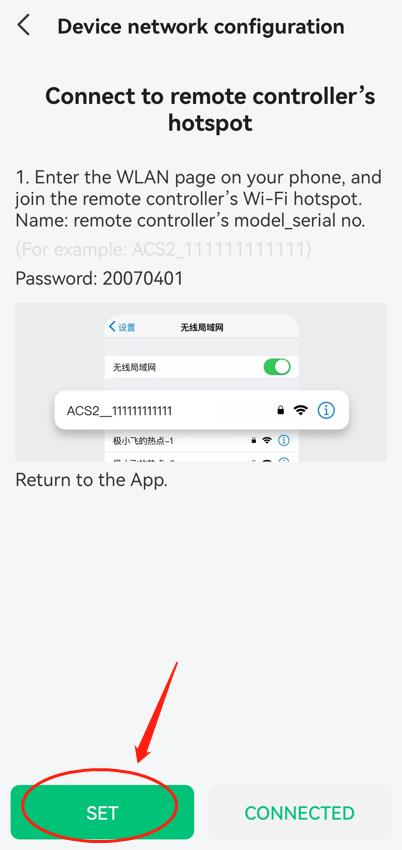
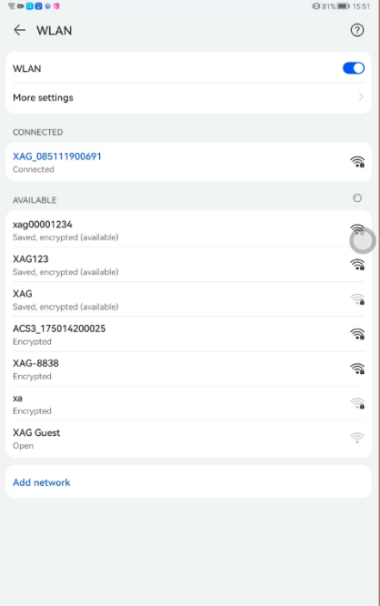
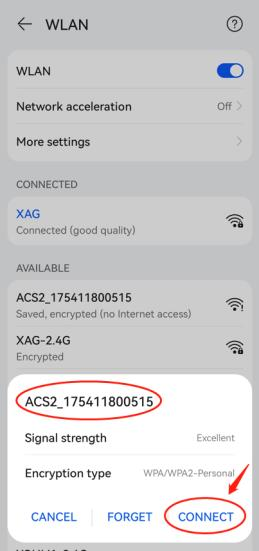
The App will navigate you to the WLAN setting page; Connect to ACS2 hotspot, whose WIFI SSID is ACS2 appended by its serial number. Input the password: 20070401, and press connect.

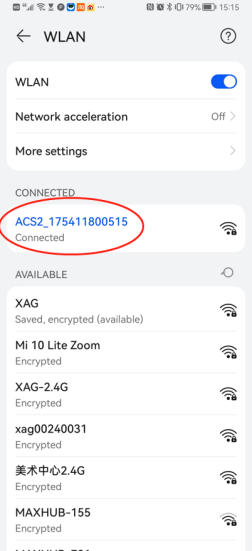
Make sure that your smartphone is connected to ACS2 hotspot successfully.

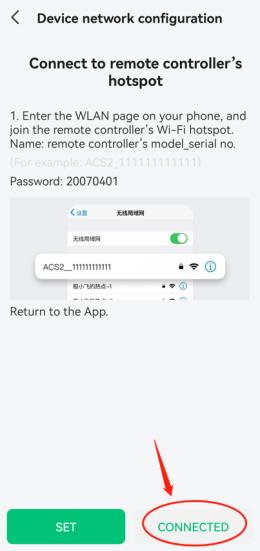
Return to the XAG One App. Press the grey button "CONNECTED "
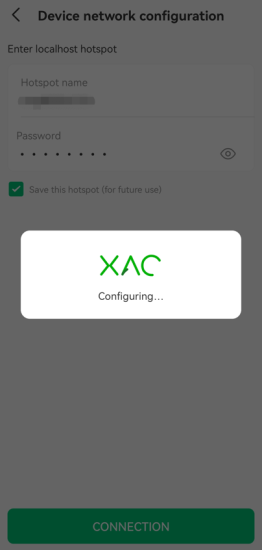
Input LNT hotspot SSID and password, click save this hotspot (for future use), press "CONNECTION".
Attention: Make sure the LNT SSID and password is correct. This action gives ACS2 remote controller the LNT’s SSID/password and allows ACS2 automatically connect LNT hotspot during start up.


It may require many attempts.
Configured. Press OK to quit. ACS2 is configured successfully.

you may hear the prompt tone of “configuration successfully”
Optional: Recommended to Restart ACS2 2021.
Wait for a while. Make sure the Power, Terminal, and Task Status light (the 1st, 2nd and 5th from the left) must be display in green. ACS2 configuration is completed. If not, ACS2 configuration must fails and please redo the whole process or report to XAG technician.
Step 5: Join ACS2 2021 to LNT Network
Objective:
Join ACS2 2021 to LNT network. This device will register on XAG cloud server through internet.
Procedure:
Make sure the ACS2 2021’s Power, Terminal and Task Status light illuminate in green. If not, please configure ACS2 again.
Connect smartphone to LNT hotspot Attention: LNT must access internet.
Since LNT hotspot is reconnected, we need to sign in XAG One account again.
Put ACS2 2021 into pairing mode
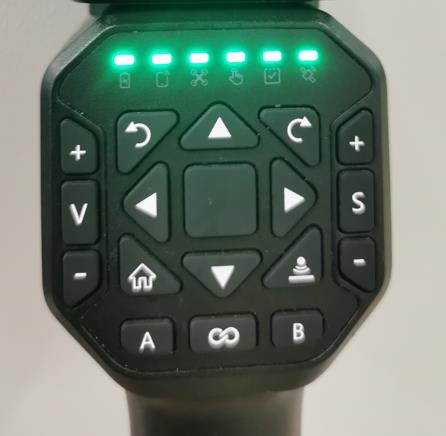
- Turn off ACS2 2021, wait for 20 seconds
- Long press the ACS2 2021 power button for more than 10 seconds until all the LED indicators are flashing red.
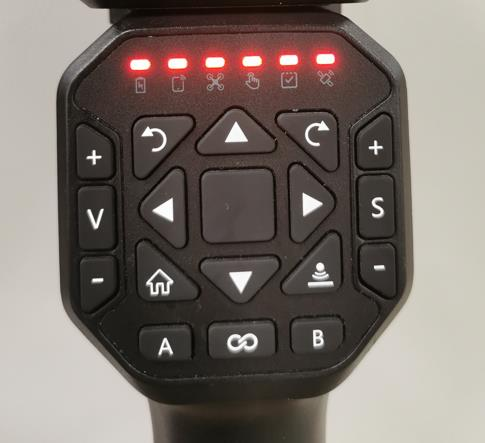
wait for a while, until you see all the light flashing green.
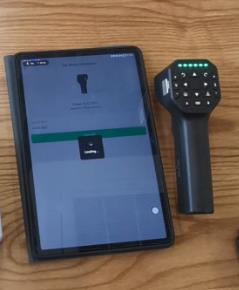
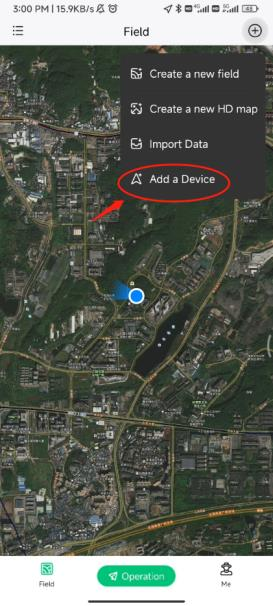
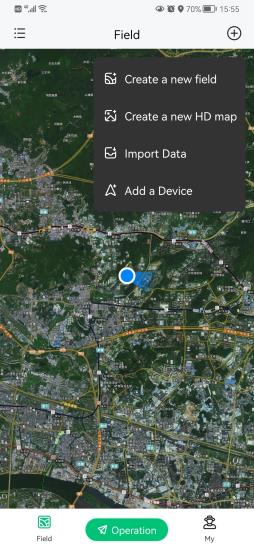
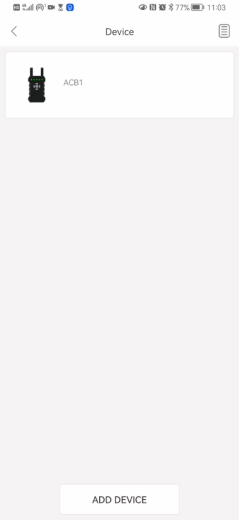
Press the green button "ADD A DEVICE"
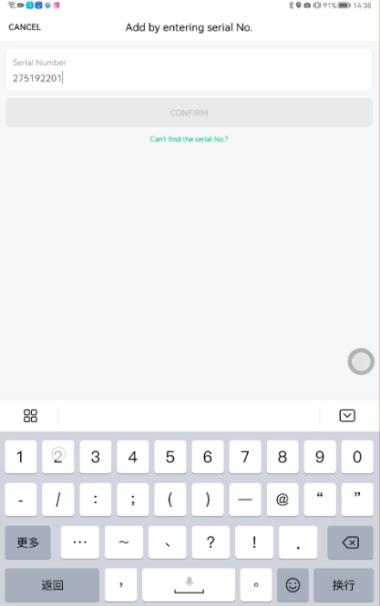
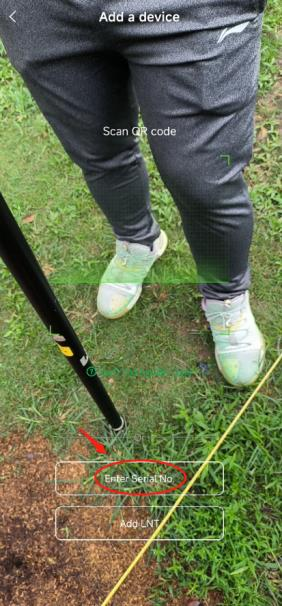
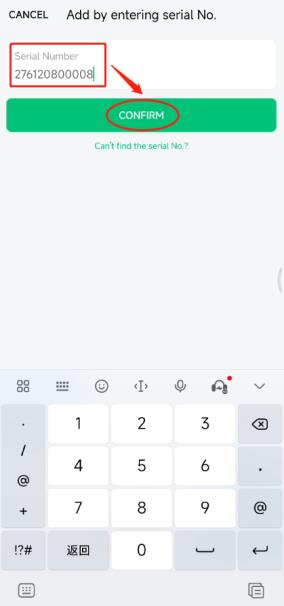
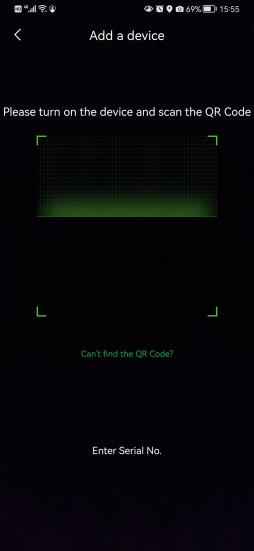
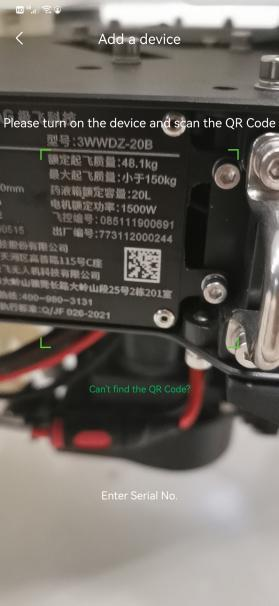
You can either scan QR code or enter serial number Make sure ACS2 2021 flashing green when adding.


If you enter serial number, press confirm to continue


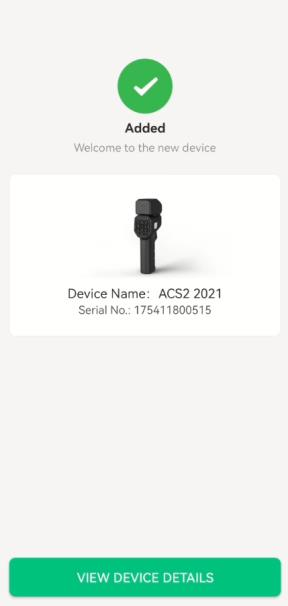
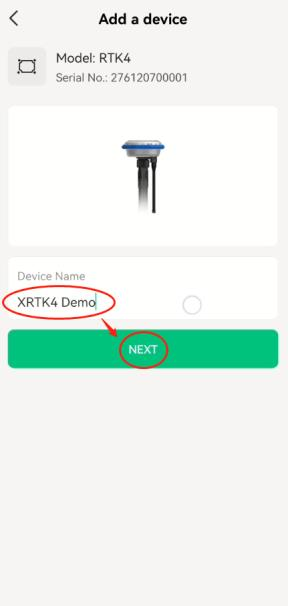
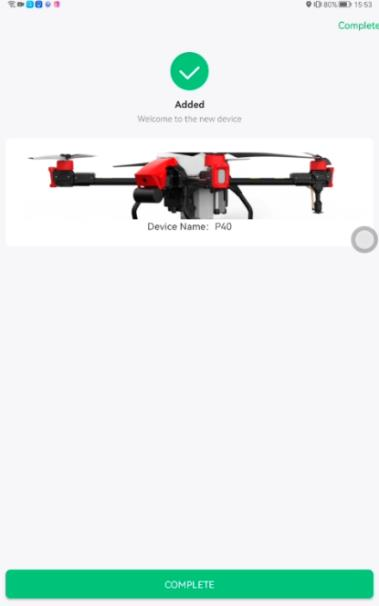
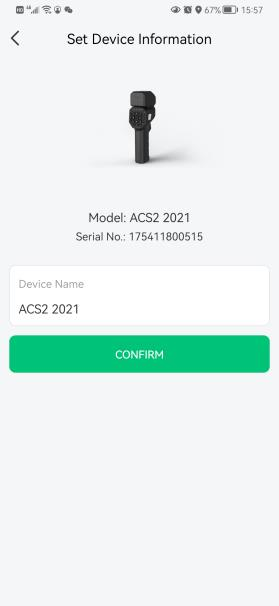
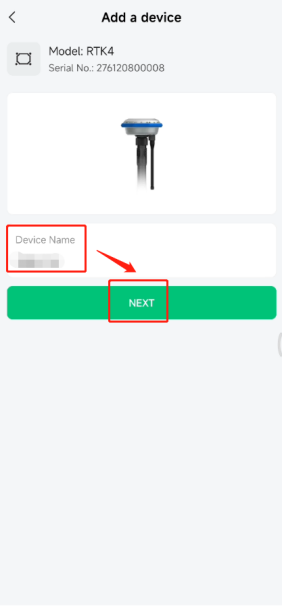
Set device information, input device name, and press confirm. This process may take for a while.


ACS2 shall be flashing green during the process.
ACS2 added successfully, press "COMPLETE"
Restart ACS2. Make sure that the power, terminal and task status LED indicator remain green.


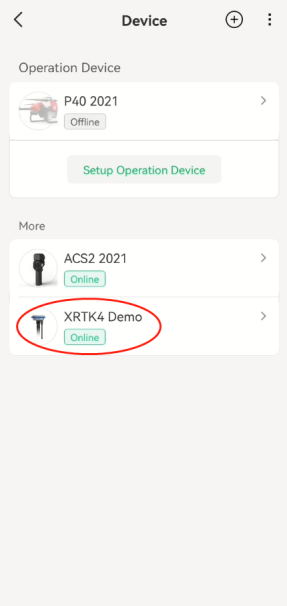
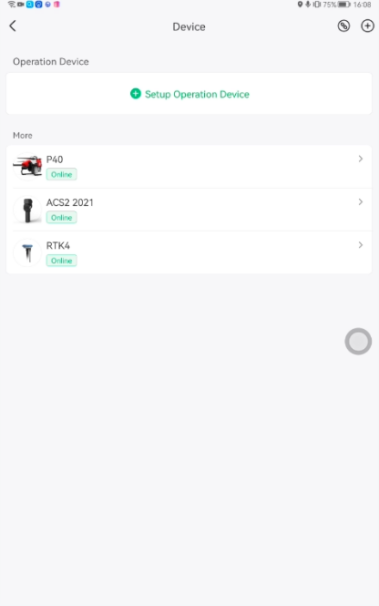
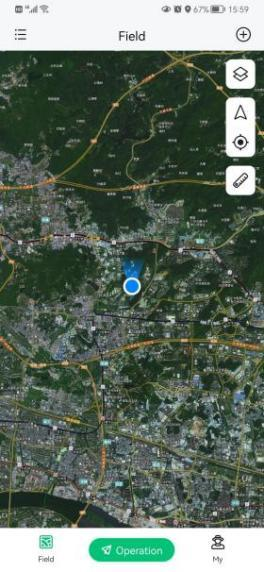
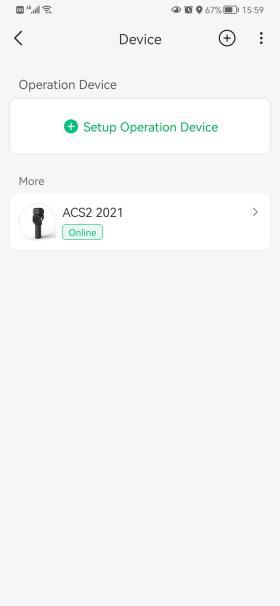
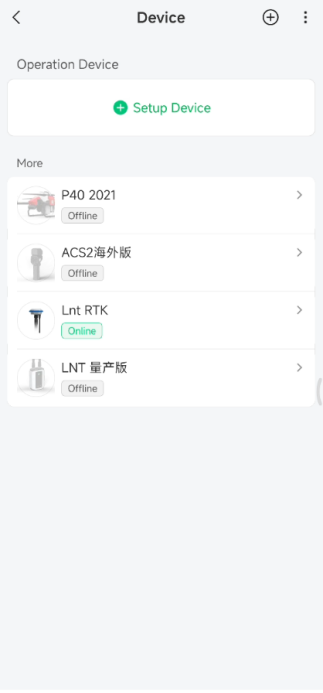
Go to "Device" and check if ACS2 2021 is online Drag down to refresh.
Optional: please restart XAG One App if it takes too long to connect.


ACS2 2021 has been added to local network terminal (LNT) and registered its serial number in XAG cloud server database. Once completed, you can feel free to update the firmware through LNT. Make sure the LNT has internet access.
Step 6: Configure XRTK4 WIFI Access
Objective:
Configure XRTK4 WIFI Access. Once configured, XRTK4 will automatically connect to LNT hotspot.
Procedure:
Connect smartphone to LNT. Make sure LNT has internet connection. Login XAG One account.
Go to  ➡Device➡
 ➡
➡ Portable base station


Check device status
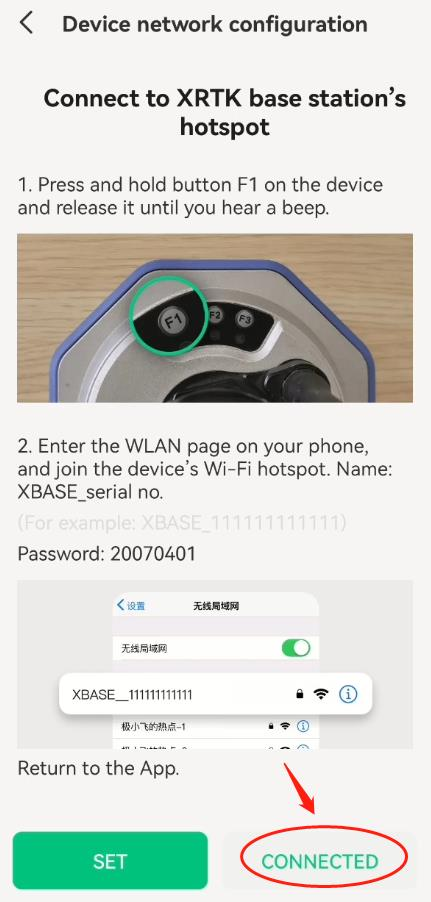
Follow the guide on App. Connect to XRTK4 hotspot.
To enable the XRTK4 hotspot, long press the F1 button on XRTK4 until you hear a beep sound.


Press “SET”. The app will direct you to the WLAN setting page.

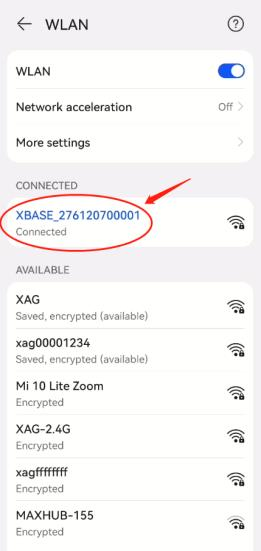
Under smartphone WLAN setting, Connect XRTK4 hotspot. The XRTK4 hotspot SSID is XBASE_[serial number], and the password is 20070401. It will take approximately 20 seconds until the XRTK4 hotspot appears.

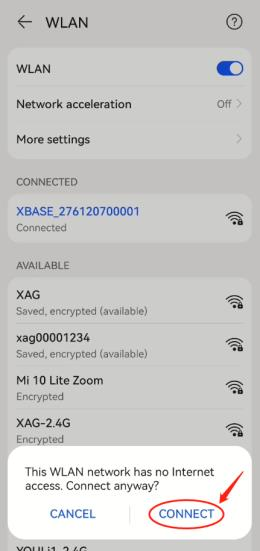
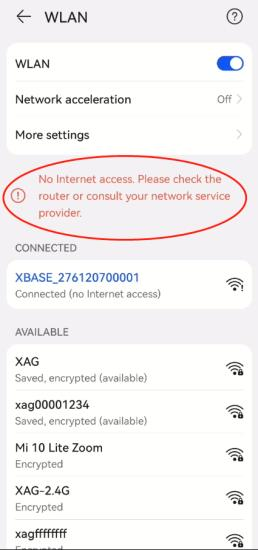
The XRTK4 hotspot has no internet access. Connect it anyway.


Return to the XAG One App.
Press the grey button "CONNECTED"

At this moment, the smartphone is directly connected to XRTK4 hotspot
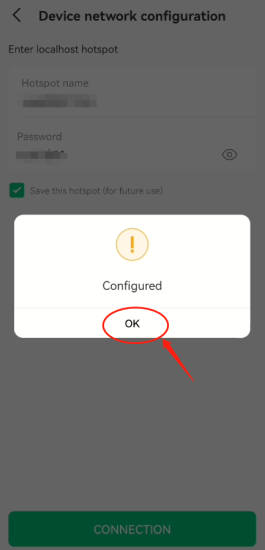
Input LNT hotspot SSID and password, click save this hotspot (for future use), press "CONNECTION".
Attention: Make sure the LNT SSID and password is correct. This action gives XRTK4 portable base station the LNT’s SSID/password and allows XRTK4 automatically connect LNT hotspot during start up.


It may require many attempts.

Configured. Press OK to quit. ACS2 is configured successfully.

 the prompt “configured” means that the credentials are successfully set for XRTK4. But it’s not guarantee that the credentials are correct. This means that the XRTK4 may have the incorrect credentials even though the “configured” is prompted.
Thus, we must check if the XRTK F2 light has triple flashing. This means that the XRTK is connected to LNT.
Wait until the F2 triple flashes. Meanwhile, F1 must flash in red.
You need to understand the meaning of F2. If F2 do not have triple flashing, please repeat this step.
| F2 flashing | XRTK4 |
| Single | No connection |
| Double | connect to Internet |
| Triple | connect to LNT hotspot |
You may need to restart XRTK4, so that XRTK4 can connect to LNT hotspot.
Step 7: Join XRTK4 to LNT Network
Objective:
After the XRTK4 connects to LNT hotspot WIFI, it has not been added in both LNT and XAG cloud server. Thus, we need to join the XRTK4 in LNT network.
 Please do not connect XRTK4 hotspot here. Because once XRTK4 WIFI access point configured, XRTK4 will automatically connect to LNT hotspot and XRTK hotspot will disappear.
Procedure:
Connect smartphone to LNT hotspot. Make sure that LNT has the access to internet.
Since LNT hotspot is reconnected, you may need to sign in XAG One account again.

Optional: Restart XRTK4.
To enable the add mode, long press F3 on XRTK4 button panel until all the LED light indicators are flashing. When you see all three lights (F1/F2/F3) synchronized flashing, it means that XRTk4 is ready to be added.


If the XRTK4 do not flash, it may be caused by
- absence of SIM card, or
- XRTK is not connected to LNT (may be due to incorrect LNT SSID or password).
Meanwhile, press to add a device
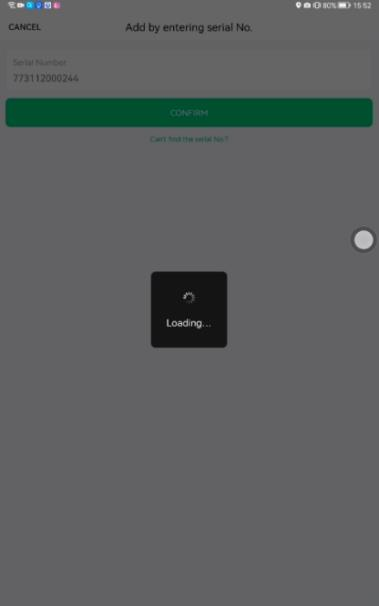
You can either scan QR code or enter serial number


If you enter serial number, press confirm to continue
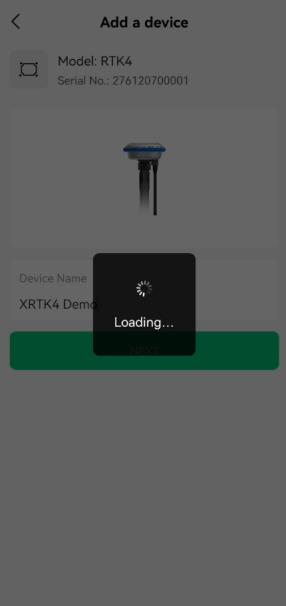
This loading process will take fore 30 seconds

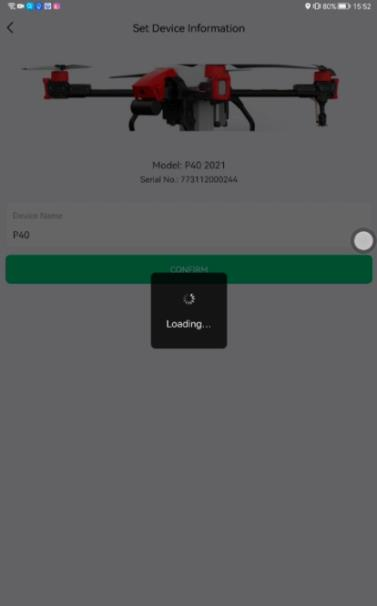
Set device information, input device name, and press confirm.
This loading process will take for approximately 60 seconds.
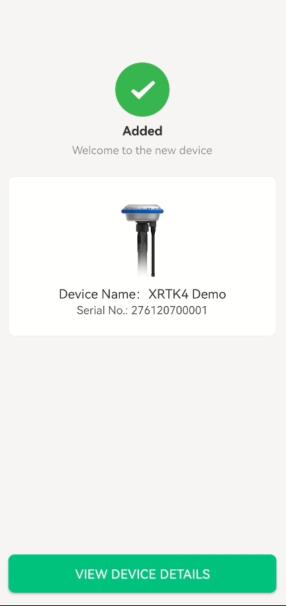
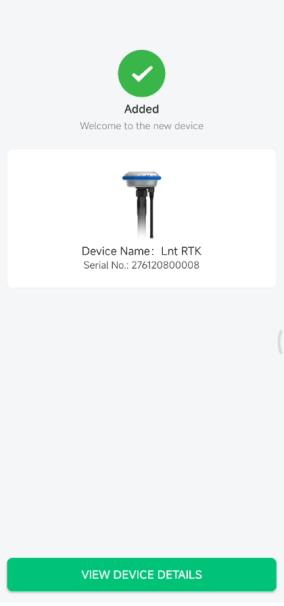
XRTK4 added successfully
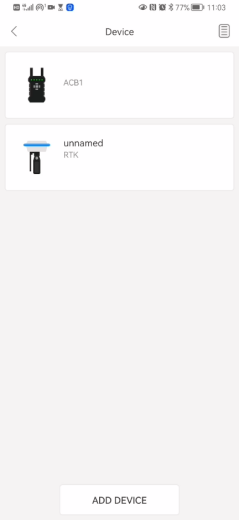
Go to "Device" and check if XRTK4 is online Drag down to refresh.
You can restart XAG One App if it takes too long to connect.
XRTK4 has been added to local network terminal (LNT) and registered its serial number in XAG cloud server database. Once completed, you can feel free to update the firmware through LNT. Make sure the LNT has internet access.
Step 8: Configure UAV WIFI Access
Objective:
Configure UAV WIFI Access. Once configured, UAV will automatically connect to LNT hotspot.
Procedure:
- Power up UAV
- Take off canopy


Go to  ➡Device➡
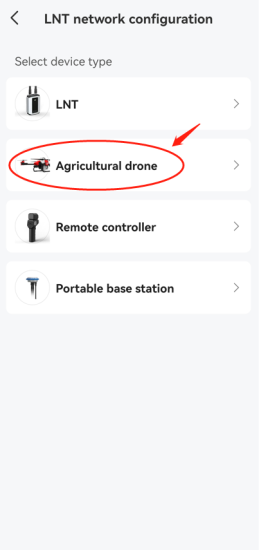
 ➡ Agriculture drone

Check device status

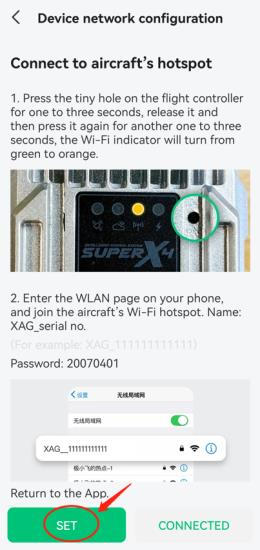
Follow the guide. Enable UAV’s hotspot. Connect smartphone to UAV hotspot.
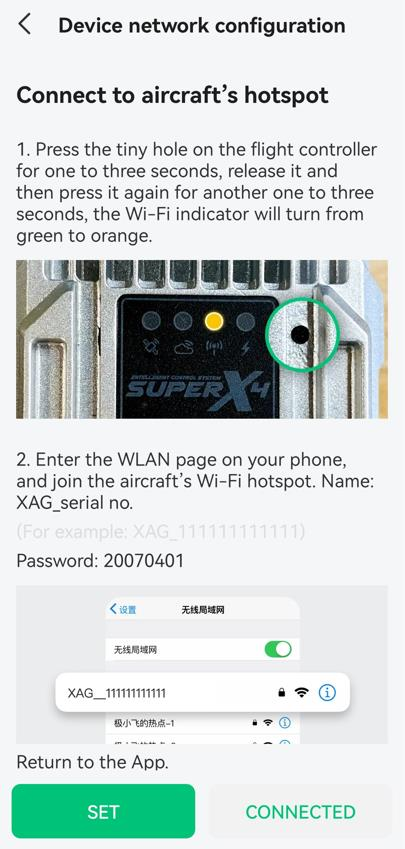
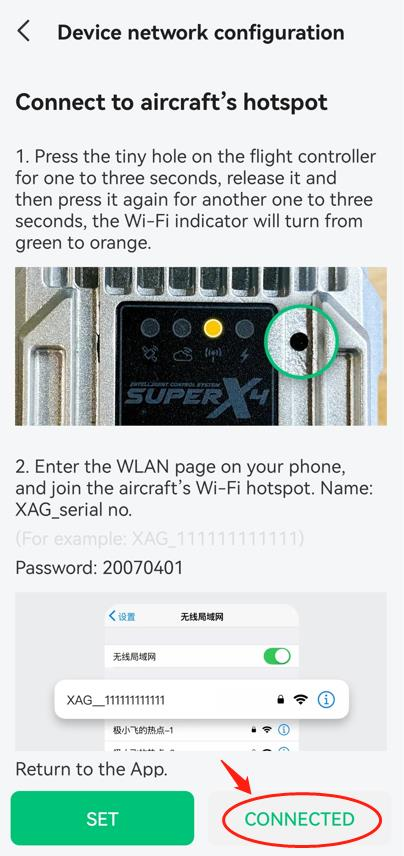
Double press the reset button on flight control

When the wireless communication LED indicator is flashing orange, it implicit that the flight control hotspot has been enabled.

Press the green button "SET"

Connect smartphone to UAV’s hotspot
UAV SSID: XAG_[serial number]
Password: 20070401
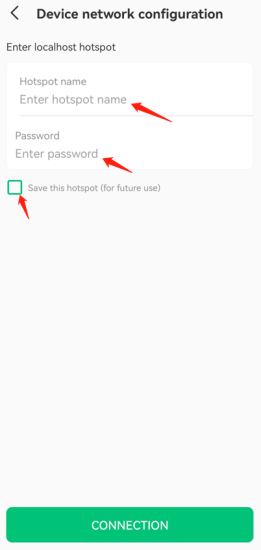
Return to the XAG One App.
Press the grey button “CONNECTED” to continue
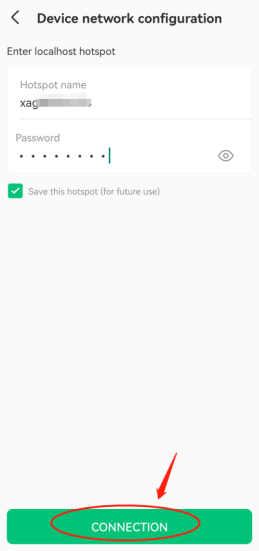
Input LNT hotspot SSID and password, click save this hotspot (for future use), press "CONNECTION".
Attention: Make sure the LNT SSID and password is correct. This action gives UAV the LNT’s SSID/password and allows UAV automatically to connect LNT hotspot during start up.


It may require many attempts.

Configured. Press OK to quit. ACS2 is configured successfully.

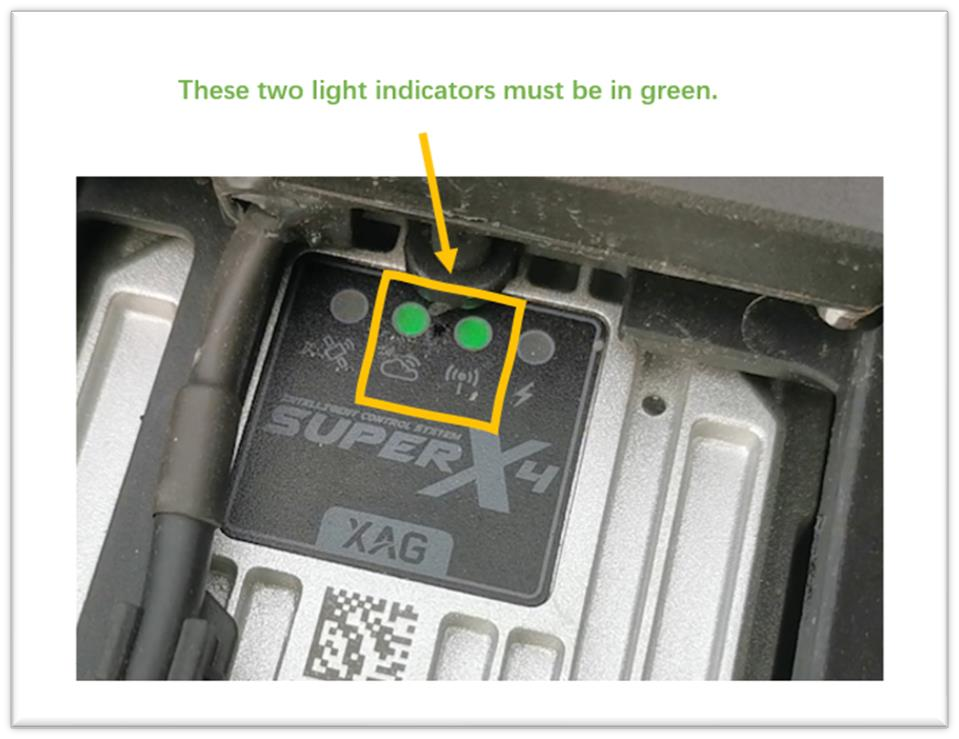
Restart UAV. The UAV will automatically connect to LNT's hotspot. Meanwhile, make sure your LNT turn on and have internet access. Please check both cloud and wireless communication LED indicator (the middle two lights) must illuminate in green. Otherwise, please contact XAG technical support.
 Once FC’s middle lights turn into green, the UAV has successfully entered LNT networking mode.
Please refer to the below table for the LED light indication.
|
LED INDICATOR |
ICON |
ILLUSTRATION |
IMPLICATION |
| Server Communication Indicator |  |
Whether device can communicate with remote server (cloud server or local network terminal) |
Flash Green: Cloud server/ Local network terminal connected Flash Red: Cloud server/ Local network terminal disconnected |
| Wireless Communication Indicator |  |
Whether HDLS module can transmit and process data |
Flash Green (slow) : OK Flash Red (rapid): No data received Flash Red (slow): Initialization OK, serial port disconnected Flash Red (rapid): Connection fail Flash Red/Green: Attempts to pair Flash Orange: WIFI mode enable (Action required) |
Step 9: Join UAV to LNT network
Objective:
Join UAV to LNT network
Procedure:
Connect smartphone to LNT hotspot
Attention: Make sure that LNT has the access to internet.

Since LNT hotspot is reconnected, we need to sign in XAG One account again.
Restart UAV
Meanwhile, press to add UAV
You can either scan QR code or enter serial number


If you enter serial number, press confirm to continue

This loading process will take approximately 30 seconds
Set device information, input device name, and press confirm.
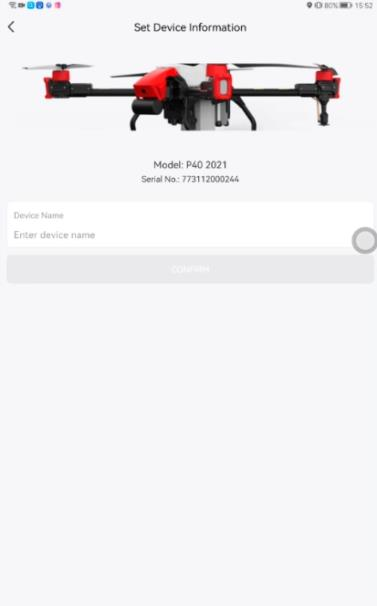
This loading process will take approximately 60 seconds.
UAV added successfully, press "COMPLETE"
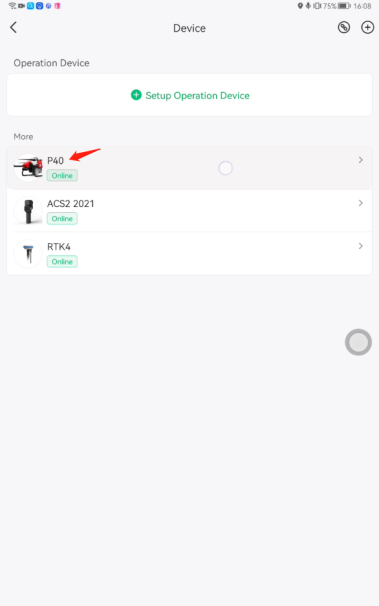
Go to "Device" and check if UAV is online Drag down to refresh.
You can restart XAG One App if it takes too long to connect.
UAV has been added to local network terminal (LNT) and registered its serial number in XAG cloud server database. Once completed, you can feel free to update the firmware through LNT. Make sure the LNT has internet access.
Step 10: Bind UAV with ACS2 2021
Go to UAV’s setting
Select "Pair with Control stick"
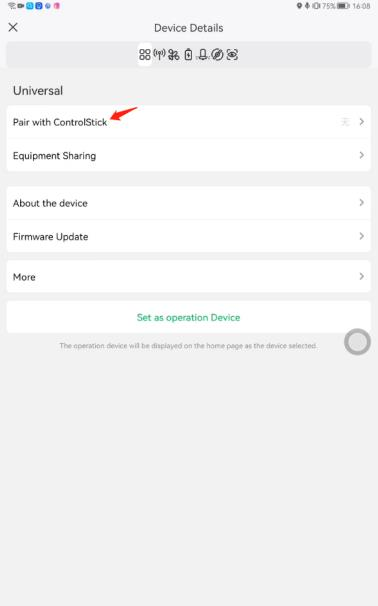
Select the ACS2 2021, and press "PAIR"
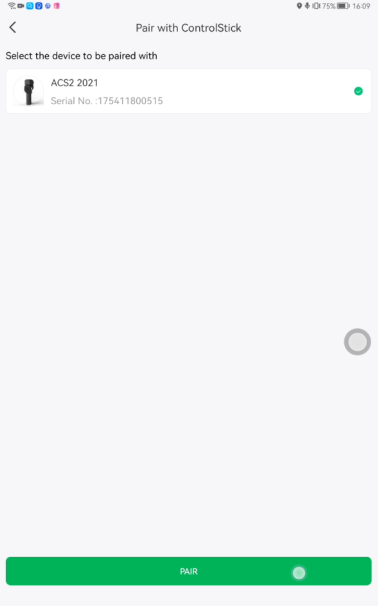
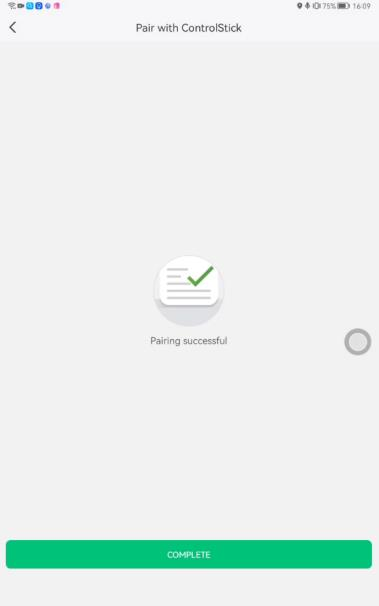
Pairing successful, press "COMPLETE"
Step 11: Connect UAV to XRTK4 under LNT Network
- Make sure that smartphone is connected to LNT hotspot
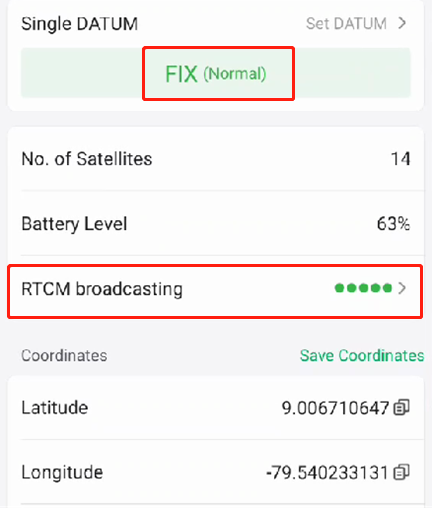
- Make sure the XRTK4 is in FIX status
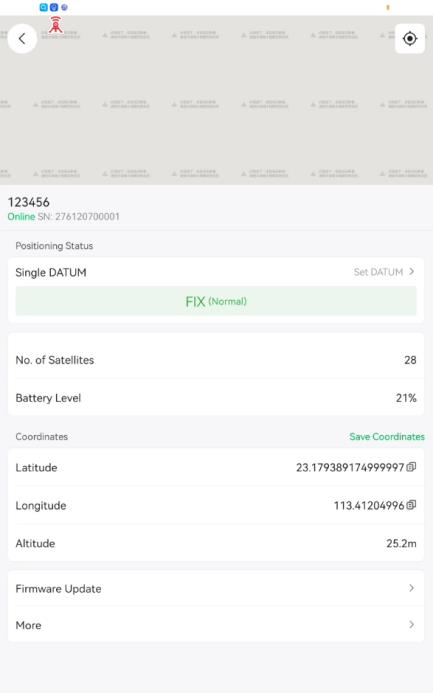
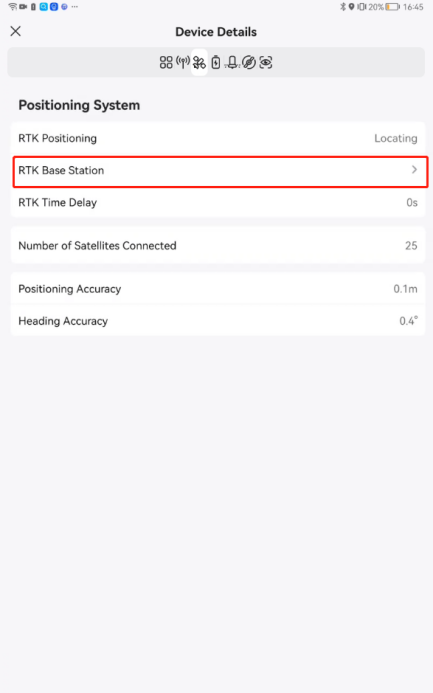
Go to UAV Positioning setting


Go to RTK Base Station
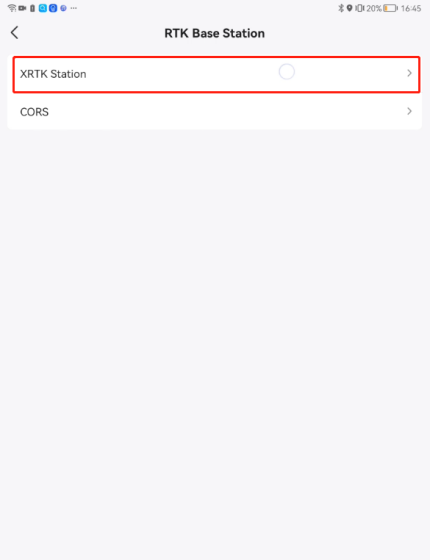
Choose “XRTK Station”
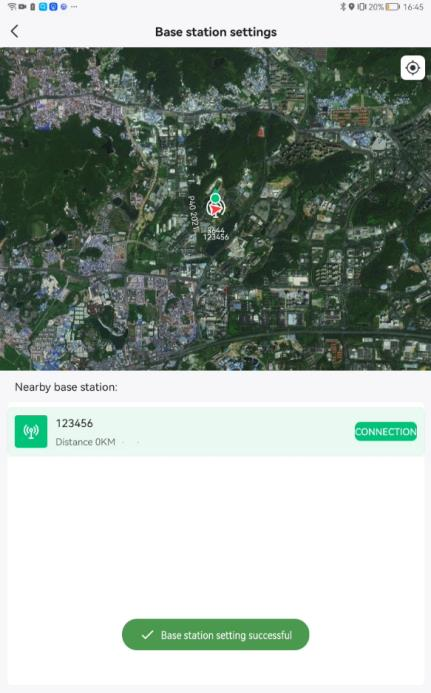
Connect your base station


Base station setting successful
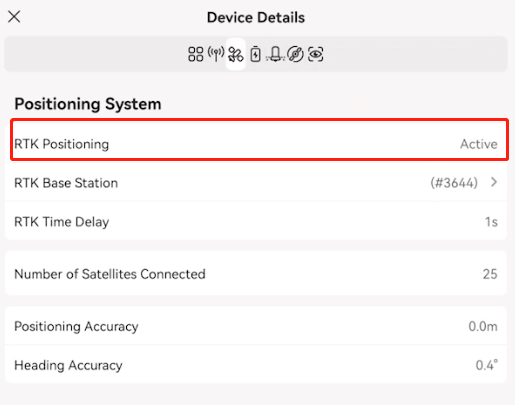
RTK Positioning is active. If any error occurs, please restart the UAV/XRTK4 and try again.
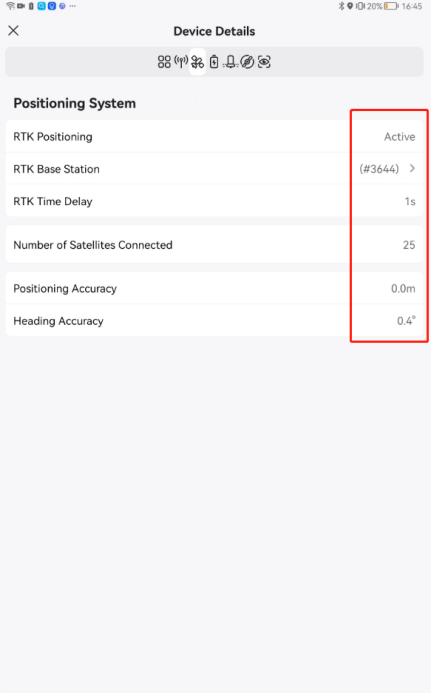
Done
LNT Network Configuration Method Two – “Add before Configure WIFI ”
Step 1: Preparation
| No. | Item | Photo |
| 1 |
UAV (model 2021/2022) |
 |
| 2 |
ACS2 2021 remote controller |
 |
| 3 |
XRTK4 Portable Base Station |
 |
| 4 |
Local Network Terminal (LNT) |
 |
| 5 |
Android/harmonious OS Smartphone |
 |
| 6 |
WIFI Router or Smartphone's hotspot that can access to internet |
 |
| 7 |
4G SIM Card |
 |
Notice:
- All the devices’ batteries must be fully charged
- All the devices must be powered up normally
Device registries in App account requires the internet access to XAG Cloud Server, where device registry data will upload to cloud server. Thus, you shall complete the LNT setup in the places where it has good internet condition.
Step 2: Update LNT Firmware to the latest version
Very important: Please update the LNT firmware to the latest version!
More than 50% of LNT configuration issue is due to the facts that the operators forget to update firmware.
- Update LNT firmware
If you don’t know how to update LNT firmware, please go the section “firmware update”. Please find out the method from the section of “firmware update”
Step 3: Connect LNT to internet through WIFI Router
Objective:
Connect LNT to WIFI Router, allowing LNT to access internet

Procedures:
Obtain local WIFI Router's SSID and password
Power up LNT
Wait for a while until the Power, WLAN and system light indicator illuminate; Meanwhile, WAN light indicator becomes dim
Connect your smartphone to LNT's hotspot
Open your smartphone's browser, input the LNT web address, http://www.iotlogin.com
Input password “20070401”
Remember the WIFI-SSID and password. Do not change them.
Go to Wireless Connection;Choose the SSID of local WIFI

Notice: press  to refresh the list if your WIFI router SSID is not shown
Input WIFI router password and press "Join"

Press "Got it"
Check WLAN connectivity. Go to LNT web page ➡Wireless Connection, check if your LNT is connected to the office WIFI router.

Check the LNT WAN light indicator.

LNT now has internet access. Please test it by browsing any websites, for example XAG official, Google, Facebook, etc..

Step 4: Add ACS2 2021 to XAG One through 4G and Update Firmware
Objective:
Add ACS2 2021 to XAG One Account through 4G, Update its Firmware
Procedure:
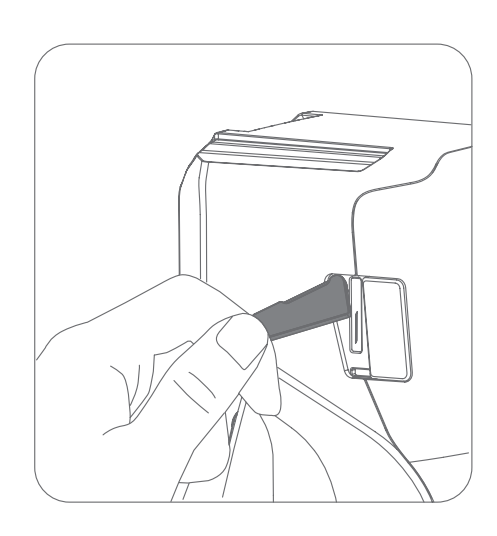
Insert SIM card into ACS2 2021
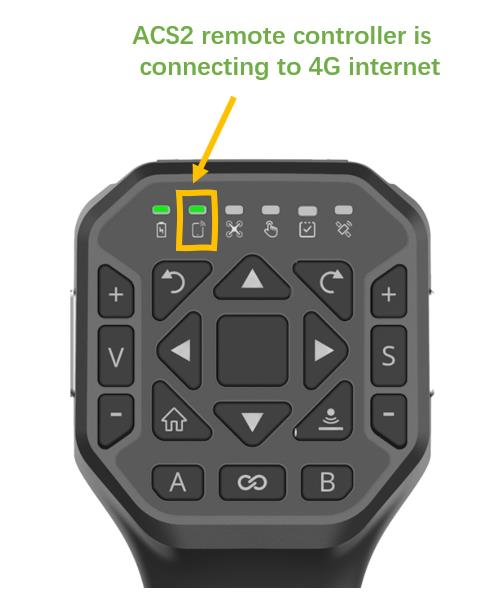
Power up,wait for 60 seconds,until the Power (1st) and Terminal LED (2nd) indicators are illuminated in green


- Power LED indicator illuminated in green. It implicit that the remaining battery is more than 30%
- Terminal LED indicator illuminated in green. It implicit that the ACS2 2021 has been connected to the XAG cloud server through internet.
 If the ACS2 2nd light is not illuminated in green, the ACS2 is failed to access internet.
Please change another SIM card or contact Xcare immediately.
- Make sure your smartphone can access to internet via 4G or WIFI router. Test it by browser website.
- Download XAG One

Update the App to the latest version
Sign in XAG One account
Click , press " Add a Device"

Input ACS2 2021 serial number manually or by scanning QR code


Follow the guide to reset ACS2 2021


Input ACS2 2021's device name and press "COMFIRM"
Device added successfully, press "COMPLETE" to return home page

press  ,
,
Press "Device"
Press 

Press “Firmware Update”
 Important Notice: Make sure update ACS2 2021 firmware!

Press “Download and update”

Wait until the update process is completed
Press "Complete" to return the device details page


Press “Firmware Update” again, Press "View Details>"
Double check if the firmware has been updated to the latest version
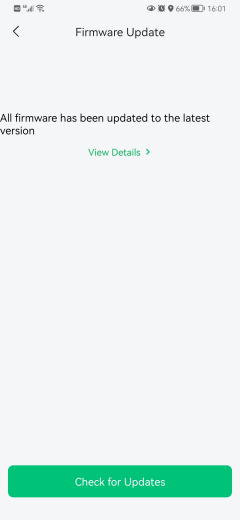
Capture the screenshot of this page for the record
The firmware version information is necessary for issue debug.

Keep ACS2 in your XAG One account
Step 5: Configure ACS2 WIFI Access
Objective:
Configure ACS2 WIFI Access. Once configured, ACS 2021 will automatically connect to LNT hotspot.
Once configured, the ACS2 will automatically join the LNT Network.
Procedure:
Connect smartphone to ACS2 2021 hotspot

Optional: To enable ACS2 WIFI mode, please REMOVE the SIM card

Power up ACS2

Wait 60 seconds until the ACS2 2021 completes initialization. Once completed, the third
light indicator  will stop flashing and becomes dim.
Connect your smartphone to LNT hotspot. Make sure LNT is connected to internet.
Open XAG One App, and sign in your account.
Attention: Local network terminal, LNT, is a fake cloud server. When the smartphone is connected to LNT, the App account will log in LNT-side server. When the LNT has the internet, the LNT will sync with XAG cloud-side server. Oppositely, when the smartphone is connected to 4G, the App account will directly log in Cloud-side server.
Go to  ➡
➡  ➡
➡ ➡
➡ ➡
➡


Check device status.
- Make sure the 1st light indicator of ACS2 2021 is in green.
- Make sure all four of LNT light indicators are in green.
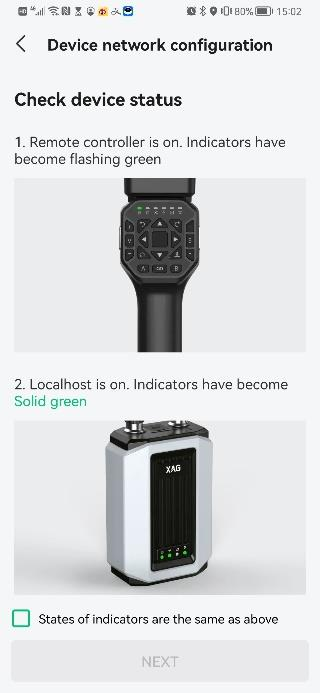
Press the green button “SET”

The App will navigate you to the WLAN setting page; Connect to ACS2 hotspot, whose WIFI SSID is ACS2 appended by its serial number. Input the password: 20070401, and press connect.
Make sure that your smartphone is connected to ACS2 hotspot successfully.
Return to the XAG One App. Press the grey button "CONNECTED "

Input LNT hotspot SSID and password, click save this hotspot (for future use), press "CONNECTION".
Attention: Make sure the LNT SSID and password is correct. This action gives ACS2 remote controller the LNT’s SSID/password and allows ACS2 automatically connect LNT hotspot during start up.


It may require many attempts.

Configured. Press OK to quit. ACS2 is configured successfully.

you may hear the prompt tone of “configuration successfully”
Optional: Recommended to Restart ACS2 2021.
Wait for a while. Make sure the Power, Terminal, and Task Status light (the 1st, 2nd and 5th from the left) must be display in green. ACS2 configuration is completed. If not, ACS2 configuration must fails and please redo the whole process or report to XAG technician.

Step 6: Add XRTK4 in XAG One App through 4G
Objective:
Add XRTK4 in XAG One account through 4G
Preparation
| No. | Item | Description |
| 1 |
Android Smartphone, Battery Fully Charged |
 |
| 2 |
XRTK4 |
 |
| 3 |
SIM card, the frequency bandwidth must be compatible with your UAV version (Domestic/Global) |
 |
| 4 |
XAG One account |
 |
Attention
- Make sure your 4G SIM card bandwidth is compatible with XRTK4 4G module.
- To know if XRTK4 4G is enabled, please check if F2 light has double flashing.
- When XRTK4 is online under 4G networking mode, XRTK4 firmware can’t be updated through App.
Procedure:
- Make sure your XRTK4 firmware has updated to the latest version. Please refer to the chapter of firmware update
- Insert 4G sim card into XRTK4
- Turn on XRTK4 and wait until it’s online. Once online, the F2 should have double flashing
- Connect smartphone to internet
- Long press F3 button until that all three LED lights are flashing
- Add device -> enter XRTK4 serial number -> define device name
Wait for loading

XRTK4 added
Check if XRTK4 is online
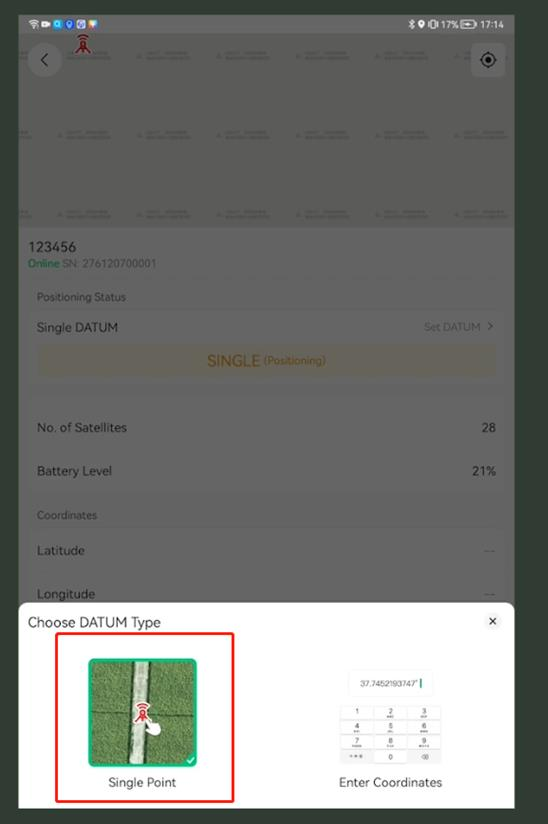
Quick test of XRTK4 single point


Step 7: Configure XRTK4 WIFI Access
Objective:
Configure XRTK4 WIFI Access. Once configured, XRTK4 will automatically connect to LNT hotspot.

Procedure:
- Remove the 4G SIM from XRTK4
- Connect smartphone to LNT. Hotspot. Make sure LNT has internet access.
- Login XAG One account on smartphone
Go to  ➡Device➡
 ➡
➡ Portable base station


Check device status

Follow the guide on App. Connect to XRTK4 hotspot.
To enable the XRTK4 hotspot, long press the F1 button on XRTK4 until you hear a beep sound.


Press “SET”. The app will direct you to the WLAN setting page.
Under smartphone WLAN setting, Connect XRTK4 hotspot. The XRTK4 hotspot SSID is XBASE_[serial number], and the password is 20070401. It will take approximately 20 seconds until the XRTK4 hotspot appears.
The XRTK4 hotspot has no internet access. Connect it anyway.
Return to the XAG One App.
Press the grey button "CONNECTED"
moment, the smartphone is directly connected to XRTK4 hotspot

Input LNT hotspot SSID and password, click save this hotspot (for future use), press "CONNECTION".
Attention: Make sure the LNT SSID and password is correct. This action gives XRTK4 portable base station the LNT’s SSID/password and allows XRTK4 automatically connect LNT hotspot during start up.


It may require many attempts.

Configured. Press OK to quit. ACS2 is configured successfully.
 the prompt “configured” means that the credentials are successfully set for XRTK4. But it’s not guarantee that the credentials are correct. This means that the XRTK4 may have the incorrect credentials even though the “configured” is prompted.
Thus, we must check if the XRTK F2 light has triple flashing. This means that the XRTK is connected to LNT.
Wait until the F2 triple flashes. Meanwhile, F1 must flash in red.

You need to understand the meaning of F2. If F2 do not have triple flashing,
please repeat this step.
| F2 flashing | XRTK4 |
| Single | No connection |
| Double | connect to Internet |
| Triple | connect to LNT hotspot |
You may need to restart XRTK4, so that XRTK4 can connect to LNT hotspot.
 Step 8: Add UAV in XAG One through 4G and Update Firmware
Objective: Add UAV in XAG One account through 4G
Preparation
| No. | Item | Description |
| 1 |
Android Smartphone, Battery Fully Charged |
 |
| 2 |
UAV (model 2021/2022) |
 |
| 3 |
SIM card, the frequency bandwidth must be compatible with your UAV version (Domestic/Global) |
 |
| 4 |
XAG One account |
 |
Attention
- Cloud Communication LED indicator of FC must illuminate in green. It implicit the 4G connection is OK.
- Taillight must flash in green. It implicit that the UAV's RTK module has found enough satellites and is able to compute its geographic position. Otherwise, the smartphone and UAV pairing may fail. This is due to the safety concerns that the XAG backend cloud server need measure the geographic position between smartphone and UAV within meters before activating UAV.
Procedure:
Insert SIM card into flight control
|
SuperX4 (V40/P40) |
 |
|
SuperX4 Pro (P100) |
  |
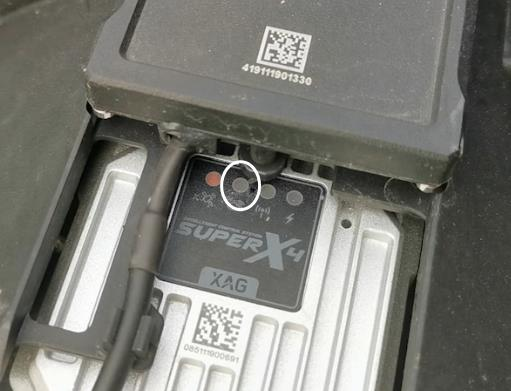
Power up UAV, wait for 60 seconds until SuperX4 connects 4G. To verify the 4G connection, check the 2nd light indicator (remote server) light indicator is flashing in green. The UAV should be placed outside, and the taillight should be green flashing.


Connect your Android smartphone to internet (4G/WIFI). Test it by browser website.

Click  , press
Input UAV serial number manually or by scanning QR code. The UAV serial number is on the nameplate.
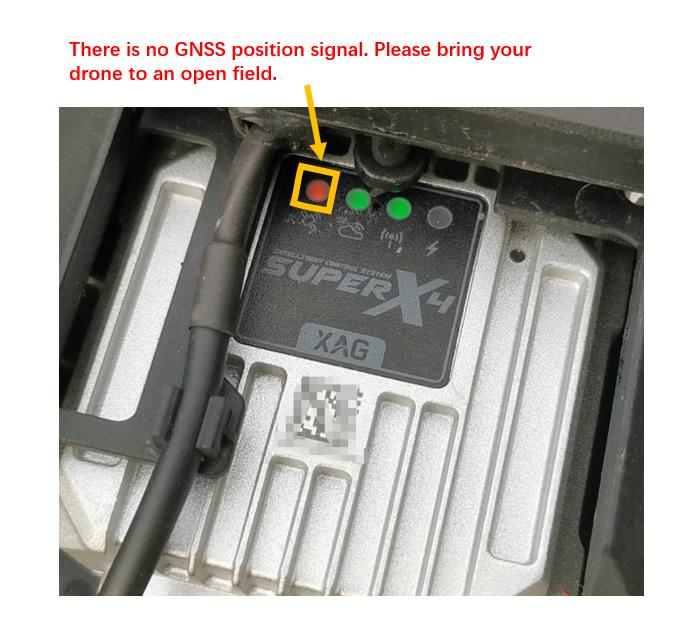
If the error “Failed to access the drone’s information” is prompted, it’s because your drone is either not connecting to 4G or losing GNSS positions. Please check your 4G connection and bring your drone to an open field with good CNSS position signal.
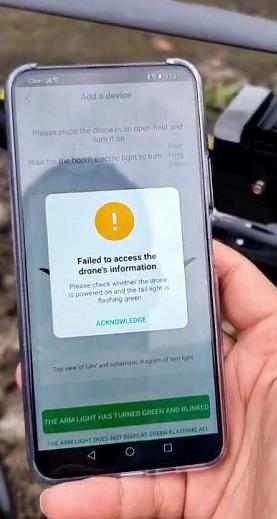
If the GNSS positioning signal is good, the 1st light indicator will be in green. If the 1st light indicator is in red, the GNSS positioning signal is bad.
Usually if it’s the first time adding the drone, the drone needs to report its physical location to the remote cloud server for security check. Thus, the drone needs to have GNSS position, which means it need to be brought onto an open field, for getting better satellites broadcast signal.
Set device name and press confirm
UAV added successfully, press complete to return

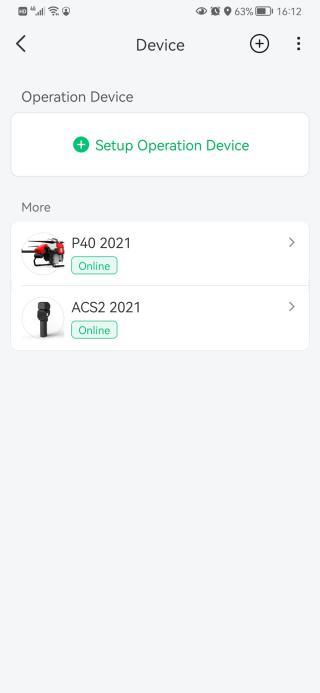
Go to My

Select your UAV, "P40 2021"
Press Firmware update
 Important Notice: Make sure update the UAV firmware!
After checking for updates, the list of firmware is shown
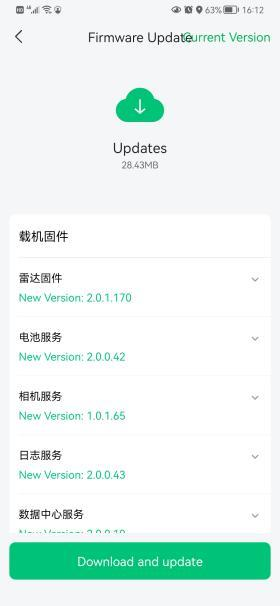
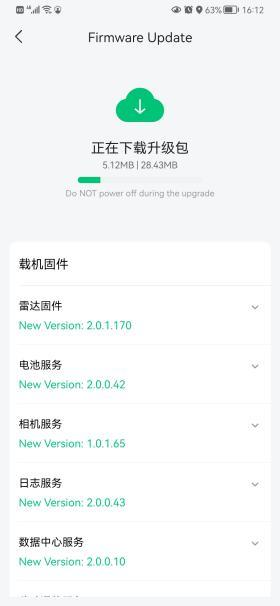
Download Firmware
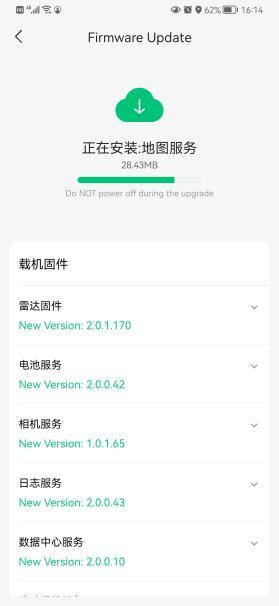
Install Firmware
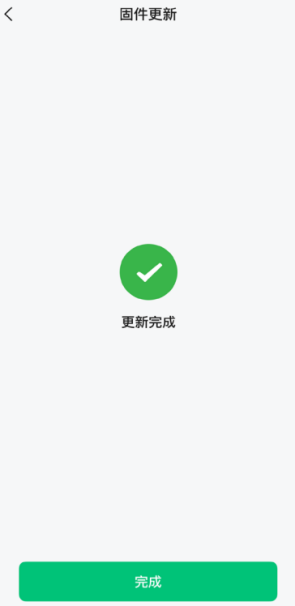
Firmware update completed
Keep the UAV in the XAG One Account
Step 9: Configure UAV WIFI Access
Objective:
Configure UAV WIFI Access. Once configured, UAV will automatically connect to LNT hotspot.

Procedure:
- Power up UAV
- Take off canopy


Go to  ➡Device➡
 ➡ Agriculture drone

Check device status

Follow the guide. Enable UAV’s hotspot. Connect smartphone to UAV hotspot.

Double press the reset button on flight control

When the wireless communication LED indicator is flashing orange, it implicit that the flight control hotspot has been enabled.

Press the green button "SET"
Connect smartphone to UAV’s hotspot
UAV SSID: XAG_[serial number]
Password: 20070401

Return to the XAG One App.
Press the grey button “CONNECTED” to continue

Input LNT hotspot SSID and password, click save this hotspot (for future use), press "CONNECTION".
Attention: Make sure the LNT SSID and password is correct. This action gives UAV the LNT’s SSID/password and allows UAV automatically to connect LNT hotspot during start up.
It may require many attempts.

Configured. Press OK to quit. UAV is configured successfully.

Restart UAV. The UAV will automatically connect to LNT's hotspot. Meanwhile, make sure your LNT turn on and have internet access. Please check both cloud and wireless communication LED indicator (the middle two lights) must illuminate in green. Otherwise, please contact XAG technical support.
 Once FC’s server and Wireless (middle two) lights turn into green, the UAV has successfully entered LNT networking mode.
 Please refer to the below table for LED light indication.
|
LED INDICATOR |
ICON |
ILLUSTRATION |
IMPLICATION |
| Server Communication Indicator |  |
Whether device can communicate with remote server (cloud server or local network terminal) |
Flash Green: Cloud server/ Local network terminal connected Flash Red: Cloud server/ Local network terminal disconnected |
| Wireless Communication Indicator |  |
Whether HDLS module can transmit and process data |
Flash Green (slow) : OK Flash Red (rapid): No data received Flash Red (slow): Initialization OK, serial port disconnected Flash Red (rapid): Connection fail Flash Red/Green: Attempts to pair Flash Orange: WIFI mode enable (Action required) |
Step 10: Bind UAV with ACS2 2021
Go to UAV’s setting

Select "Pair with Control stick"

Select the ACS2 2021, and press "PAIR"

Pairing successful, press "COMPLETE"

Step 11: Connect UAV to XRTK4 under LNT Network

- Make sure that smartphone is connected to LNT hotspot
- Make sure the XRTK4 is in FIX status

Go to UAV Positioning setting


Go to RTK Base Station

Choose “XRTK Station”

Connect your base station


Base station setting successful

Positioning is active. If any error occurs, please restart the UAV/XRTK4 and try again.

Done
Quit LNT networking mode
Things you need to know before quitting LNT networking mode:
- LNT networking mode does not allow devices (UAV/ACS2) to have 4G access. If you want to enable 4G access, please switch your devices from LNT networking mode to 4G networking mode.
- Your devices will remain in your XAG ONE APP ACCOUNT
- XRTK4 don’t quit LNT networking mode as it don’t need to.
UAV Quits LNT networking mode
To quit LNT networking mode, press the reset button on UAV for 6~9 seconds, release it for less than 3 seconds, then press the reset button for 6~9 seconds again.
WIFI and Cloud indicator turns into orange, shut down the UAV, wait for more than 5 minutes, start the UAV again. The UAV is supposed to quit LNT networking mode.
Once quitted, UAV will automatically switch to 4G networking mode. The UAV will automatically switch to 4G networking mode.
ACS2 2021 remote controller Quits LNT networking mode
LNT networking mode does not allow ACS2 2021 remote controller to have 4G access. If you want to enable 4G access, please switch your flight control from LNT networking mode to 4G networking mode.
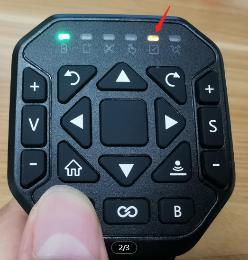
To quit LNT networking mode on ACS2 2021 remote controller, please long press button A until you hear a voice prompt as well as the 5th LED indicator light become dim.
After quitting, ACS2 2021 will be in 4G networking mode.
To test it, search the ACS2’s WIFI hotspot under smartphone WLAN setting. If ACS2 hotspot can be found, it means that ACS2 remote controller has WIFI enabled and successfully switched from LNT networking mode to 4G.
XRTK4 with LNT networking mode
It’s not necessary to quit LNT networking mode of XRTK4 (change XRTK4 networking mode from LNT to 4G), as XRTK4 can support networking mode for both 4G and LNT.
There are two options to have XRTK positioning used in 4G, which are XRTK4 or CORS.
- Switch XRTK4 from LNT networking mode to 4G
- Insert 4G SIM into XRTK4. You may need to disassembly the XRTK to insert the 4G SIM card. Make sure the SIM card is compatible with UAV.

Long press F3 button until that all three LED lights are flashing
As using the same account, the XRTK will automatically appear in your XAG One App account.
XRTK4 firmware cannot update through 4G. if you want to update in the future, please use the ACS2 2020 / XAG Agri 2 App method to update XRTK4 firmware. In most situation, the XRTK4 do not need to update its firmware.
If you are ready to fly the UAV, then place your XRTK4 on open field and use single point positioning. Wait for the XRTK4 go into FIX mode.
Connect UAV and ACS2 2021 remote controller to XRTK4
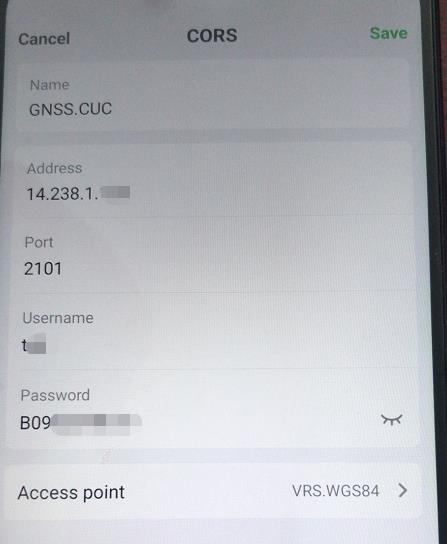
CORS setup
- You must have a valid CORS account
- Make sure your UAV and ACS2 remote controller has internet access through 4G
- On XAG One App setting, connect UAV and ACS2 2021 remote controller to
- CORS
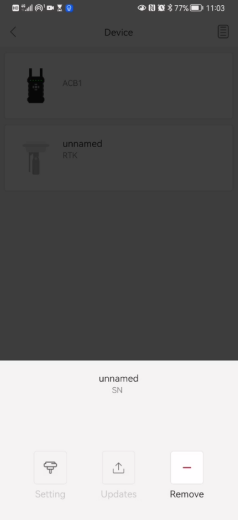
Remove devices under LNT networking mode
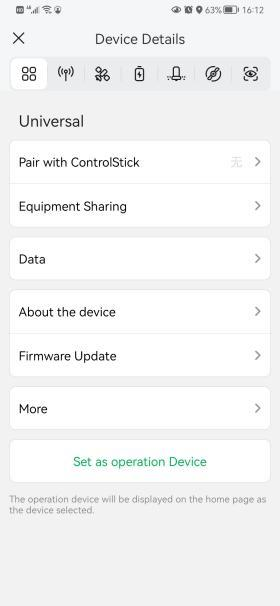
Click into the ACS2, go to “Device Details”, press “REMOVE DEVICE”


Click into UAV, go to “More”, click “Remove device”


LNT Troubleshooting
Check LNT light indicators

|
LNT |
Description |
Light On |
Light off |
Light flashing |
|
Power |
Related to battery |
Device on |
Device off |
N/A |
|
WLAN |
Related to WIFI |
WIFI OK |
WIFI malfunction |
Initializing, please wait |
|
WAN |
Related to internet |
Connect to internet through WIFI router or mobile hotspot |
Disconnected from internet |
Initializing, please wait |
|
System |
Related to system programs |
System OK |
System frozen |
Initializing/firmware updating/factory reset, please wait |
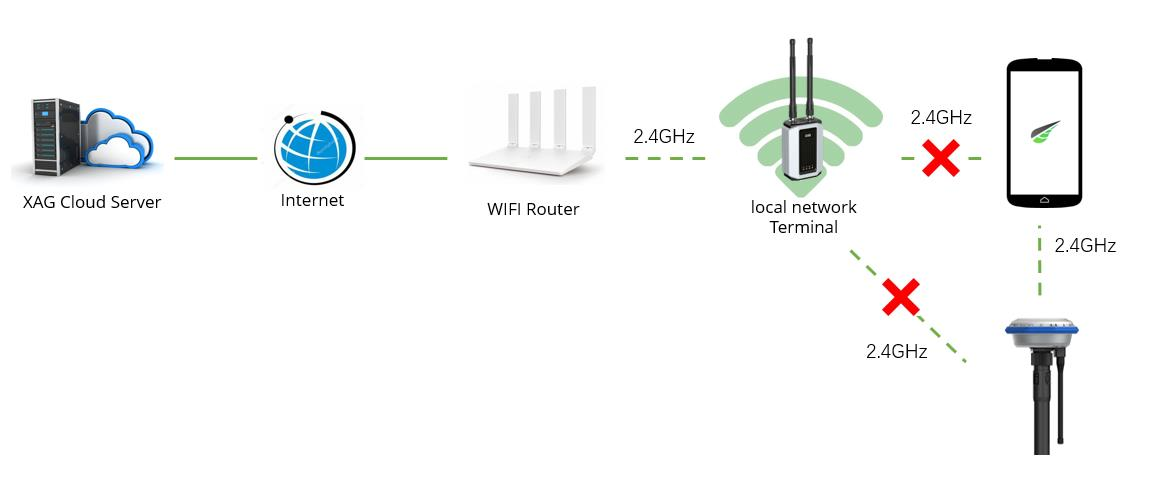
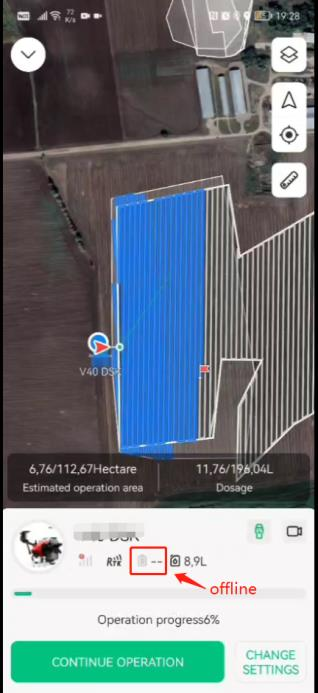
Problem Solved: All Devices Show Offline under LNT Networking Mode
 Users may find the issue that all devices are offline under LNT networking mode.
To solve this issue, please follow the below steps:
Step 1: Restart all devices
Restart all devices and make multiple attempts if it does not work. Make sure do a cold restart for UAV.
Kill the XAG One App and restart the App multiples times.
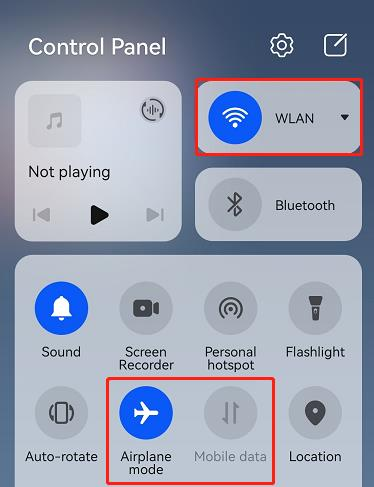
Step 2: Turn on your smartphone’s flight mode and disable mobile data
Disconnect smartphone from mobile network. You can turn on the flight mode and enable the WLAN to block mobile data.
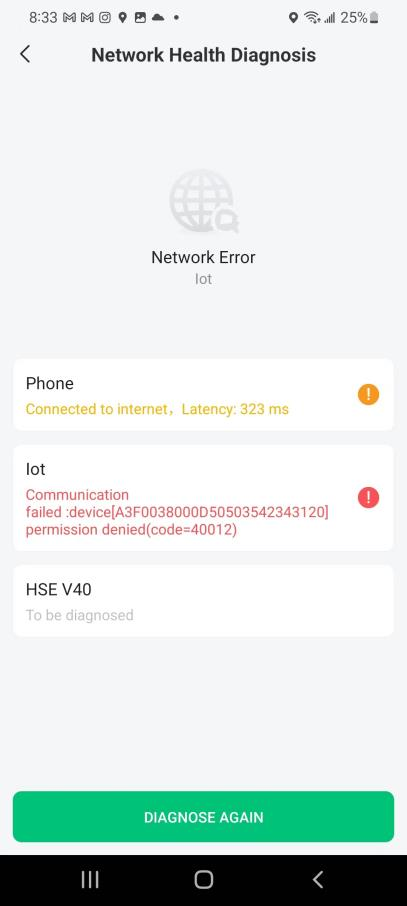
Step 3: Run Network Safety Diagnosis
Before network safety diagnosis, please turn on WAN mode.


If you forgot to enable LNT WAN mode, you will see the below alarm.


If network diagnosis is OK, you will see the network delay or the green mark.

If network diagnosis fails, you will usually see the errors of IOT communication failures along with permission denied. In this case, you can remove all the devices from your account or consult with XAG technical support.
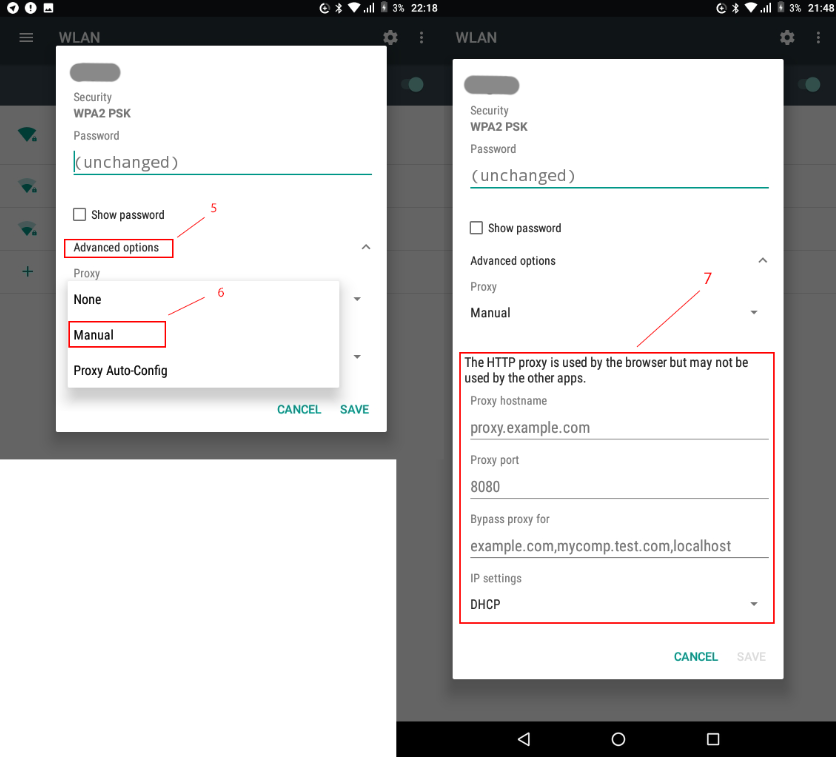
Step 4: Disable smartphone proxy
Check if the smartphone WLAN has proxy server setting. If yes, please do not use proxy server
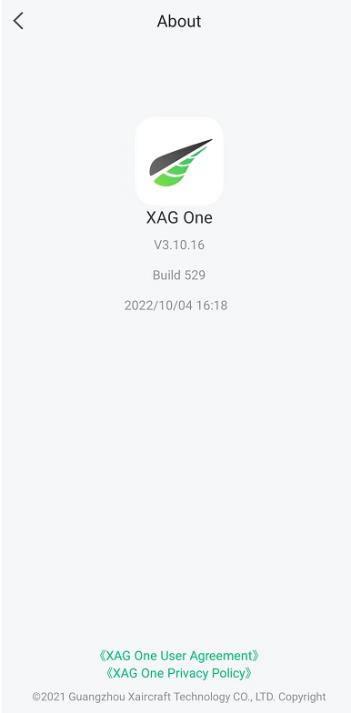
Step 5: Update your XAG One App to the latest firmware version
App version shall be above V3.10.16.
Troubleshooting Cases
General
Problem & Scenario: 1st light indicator (Power) become dim
Analysis & Solution:
- Power supply abnormal, please check the condition of power supply
- LNT hardware issue. Please ask for return- to-factory service
Problem & Scenario: 2nd light indicator (WLAN) become dim
Analysis & Solution:
- Software malfunction. Please restart LNT
- WIFI firmware corrupted. Please factory reset the LNT
- WIFI hardware issue. Please ask for return- to-factory service
Problem & Scenario: 4th light indicator (System) become dim
Analysis & Solution:
- If it happens during LNT startup, the firmware may be corrupted. Please factory reset the LNT
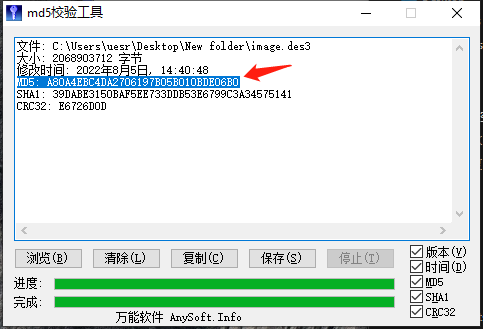
- If it happens during firmware update, the firmware file may be corrupted. Please use MD5 software to verify the firmware file. Use MD5 calibration tool to analyze the firmware file, report MD5 value to XAG technician. According to MD5 value, we can know if the firmware file is damaged or not. Please ask XAG technician for MD5 calibration tool.
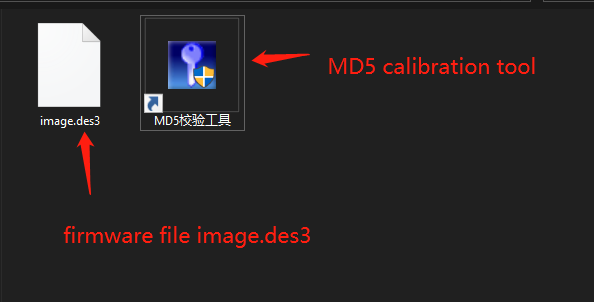
MD5 tool Download Link: please refer to Appendix II
Problem & Scenario: the 1st light indicator illuminates in green, but other indicators become dim.
Analysis & Solution:
- Sometimes the LNT startup take longer than usual. Please wait.
- Firmware issue. Please perform the firmware update or factory reset.
Problem & Scenario: LNT hotspot can’t be found.
Analysis & Solution:
- During the LNT initializing, the 2nd light indicator is flashing in green. Please make sure the 2nd light indicator (WLAN) stops flashing and illuminate in green. Then, the LNT hotspot shall be found.
- LNT hotspot is OK, but the smartphone has WLAN connection problem. Please restart the smartphone and refresh the WLAN list.
- Firmware issue. Please restart LNT.
- Firmware corrupted. Please perform factory reset.
- Hardware issue. Please ask for return-to-factory service
Problem & Scenario: LNT hotspot can be found, but smartphone or computer can’t connect to the LNT hotspot.
Analysis & Solution:
- Password is incorrect.
- The WLAN is still initializing. Please wait until the 2nd light indicator illuminate in green.
- Network busy. Please have more attempts.
- Firmware issue. Please restart LNT.
- WIFI firmware corrupted. Please perform factory reset.
Problem & Scenario: cannot open configuration page (www.iotlogin.com)
Analysis & Solution:
- Please check the WIFI connection between smartphone and LNT
- The WLAN is still initializing. Please wait until the 2nd light indicator illuminate in green.
- Please check if the configuration page (www.iotlogin.com) is correct. You can also try 10.8.10.100 on your browser.
- Firmware issue. Please restart LNT.
- Firmware update
- Factory reset
Problem & Scenario: www.iotlogin.com configuration page can’t find other WIFI routers or hotspot
Analysis & Solution:
- LNT only support 2.4GHz WIFI. Please make sure your WIFI routers or hotspots are broadcasting in 2.4GHz
- WIFI network is busy. Please refresh and have more attempts
Problem & Scenario: LNT fail to connect internet (WIFI router, hotspot)
Analysis & Solution:
- When LNT is under work mode, it will not allow to connect internet.
- The password is incorrect.
- Parent devices (WIFI router and hotspot) may not quit
- Parent devices (WIFI router and hotspot) do not have internet access
- Parent devices (WIFI router and hotspot) has very poor internet access
Problem & Scenario: There is no response after inserting USB flash drive
Analysis & Solution:
- The “image.des3” is missing in the USB flash drive
- The USB flash drive is corrupt, damaged, or defective.
- LNT system corrupted, please factory reset LNT
Problem & Scenario: Can’t find any firmware files when using USB flash drive manual update
Analysis & Solution:
- Check if the USB flash drive is inserted properly
- The “.des3” files are missing in the USB flash drive
- The USB flash drive is corrupt, damaged, or defective.
- LNT system corrupted, please factory reset LNT
Problem & Scenario: Fail to update LNT firmware when using USB flashing drive
Analysis & Solution:
- The firmware file may be corrupted. Please use MD5 software to verify the firmware file. Use MD5 calibration tool to analyze the firmware file, report MD5 value to XAG technician. According to MD5 value, we can know if the firmware file is damaged or not. Please ask XAG technician for MD5 calibration tool.


MD5 tool Download Link: please refer to Appendix II
- The USB flash drive is corrupt, damaged, or defective.
- The USB flash drive is loosened from LNT during the firmware update.
- Firmware update is not completed. Please remove USB flash drive, restart LNT and plug in the USB flash drive again. Then firmware update will start automatically.
- LNT system corrupted, please factory reset LNT
Problem & Scenario: Factory reset failure
Analysis & Solution:
- Fail to follow the reset guide. Please release the reset button when the system light indicator is flashing at the 2nd time. The reset process will take for 30 minutes.
- Restart LNT and have more attempts.
- Hardware issue. Please ask for return-to-factory service.
Problem & Scenario: no response when pressing power button to turn on LNT
Analysis & Solution:
- BIOS malfunction. Please ask for return-to-factory service.
- Hardware issue. Please ask for return-to-factory service.
Problem & Scenario: no response when pressing power button to turn off LNT
Analysis & Solution:
- Firmware issue. Please update the firmware to solve this problem.
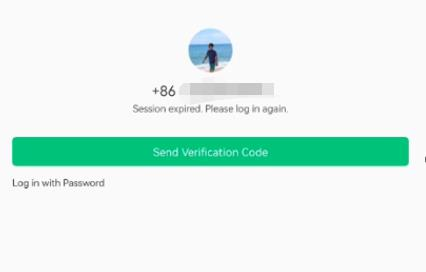
- Hardware issue. Please ask for return-to-factory service.
Problem & Scenario: fail to login account under LNT networking mode. The App returns “unknown error”.


Analysis: This is because the LNT don’t have your account info. It usually happens after factory reset of LNT , which results in lost all user data.
Solution: To solve this issue, please connect your LNT to internet, then login your account, and wait for a while. This will allow the LNT sync the user data with XAG cloud server. Then disconnect the LNT from internet. login your account again.
Problem & Scenario: fail to login account due to the “connection error”
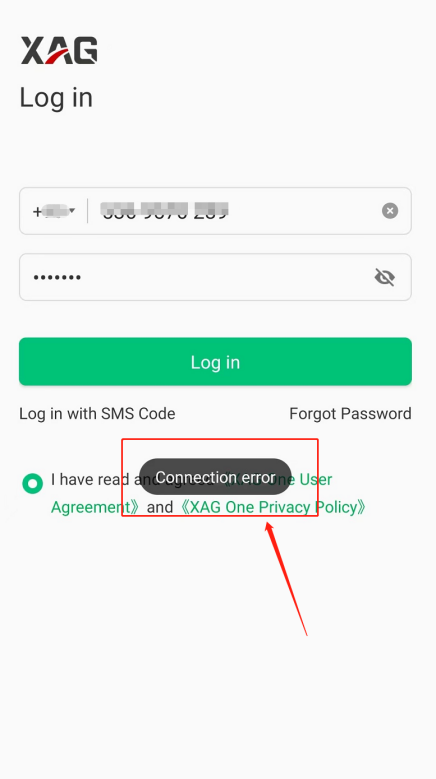
Analysis: This is because some LNT background processes crashed.
Solution: Please reboot the LNT. If this error occurs frequently, contact XAG technical support. It required remote debug.
Problem & Scenario: fail to login the www.iotlogin.com after turning on LNT working mode
Analysis & Solution: This could be the smartphone issue. Delete the LNT SSID from WLAN, restart WLAN, connect the LNT SSID again. You are supposed to login again.
ACS2 2021 Related
Most ACS2 2021 problem is due to the issue of firmware update, please update your firmware to the latest version. Once the ACS2 2021 is successfully configured, the power, terminal, task status (the 1st, 2nd, 5th from the left) should illuminate in green.

| LED indicator | Indication |
|
Power |
Yellow: Battery is low |
|
indicator |
Green: Battery is OK |
|
Terminal |
Dim: No server communication |
|
indicator |
Green: server communication OK, either cloud server or LNT (local server) |
|
Task Status |
Yellow: Able to search LNT hotspot SSID but the password is wrong |
|
indicator |
Green: Connect to LNT hotspot Red: Fail to search LNT SSID, possible causes are LNT lost power, wrong SSID, wrong firmware Dim: not working, perhaps firmware is wrong |
Problem: Fail to configure
Scenario: Terminal light (the 2nd from the left) become dim.
Task Status (the 5th from the left) light illuminates in orange

Analysis: Wrong WIFI Credentials.
The dim Terminal light (the 2nd from the left) implicit that ACS2 fail to connect neither Cloud server or LNT (Fake local server).
The orange task status (the 5th from the left) light implicit that ACS2 is trying to connect one’s WIFI but the credentials is wrong. This WIFI may not be necessarily a LNT hotspot. It can be any WIFI that is discovered nearby.
Solution: Long press button A to quit LNT mode. Input WIFI correct credentials again.
Problem: Fail to configure
Scenario: Terminal light (the 2nd from the left) illuminates in green
Task Status (the 5th from the left) light illuminates in red

Analysis: There may be two problems happening concurrently.
The red task status (the 5th from the left) light implicit that ACS2 fail to search LNT hotspot. Most likely the LNT is off.
The green Terminal light (the 2nd from the left) implicit that ACS2 is connecting to a remote server. Since LNT (fake server) is off, ACS2 must be connecting to cloud server using 4G network. Thus, the 4G Sim card is inserted into ACS2.
Solution: Remove 4G sim card from ACS2, and then restart ACS2. Turn on or restart LNT device.
Problem: Fail to configure
Scenario: Terminal light (the 2nd from the left) become dim. Task Status (the 5th from the left) light illuminates in red

Analysis: Wrong credentials of LNT hotspot SSID / LNT is disconnected from power source.
The red task status (the 5th from the left) light implicit that ACS2 fail to search the given credential SSID. This SSID does not quit nearby. It may be resulted from either wrong credential of LNT hotspot SSID or LNT disconnected from power source.
The dim Terminal light (the 2nd from the left) implicit that ACS2 is not connecting to a remote server (LNT) because ACS2 don’t connect to LNT hotspot.
Solution: Enter the correct credentials of LNT / Turn on or restart LNT device.
Problem: Fail to configure
Scenario: the terminal light changes from green to dim. the
task status light changes from green to orange.


Analysis: LNT may be turned off or frozen.
The task status (the 5th from the left) light changes from green to orange, which implicit that ACS2 used to access LNT, but for now it can only find the LNT hotspot, but the LNT gives no response.
The Terminal light (the 2nd from the left) change from green to dim. It implicit that ACS2 lost the communication to the LNT.
Solution: Restart LNT
Problem: Fail to configure
Scenario: The terminal light changes to green to dim, while the status light stays at green.


Analysis: LNT may be turned off or frozen.
The Terminal light (the 2nd from the left) change from green to dim. It implicit that ACS2 lost the communication to the LNT.
The task status (the 5th from the left) light stays at green. Because the terminal light become dim, the ACS2 has no access to LNT hotspot. The green task status light may lose shortly. This can be caused by the delay in computation or long response time. If you wait long enough, approximately > 2 minutes. The ACS2 should change from green to orange.
Solution: Restart LNT
XRTK4 related
Problem: XAG Agri 2 App searches for a long time but can’t find XRTK4
Scenario: N/A
Analysis & Solution:
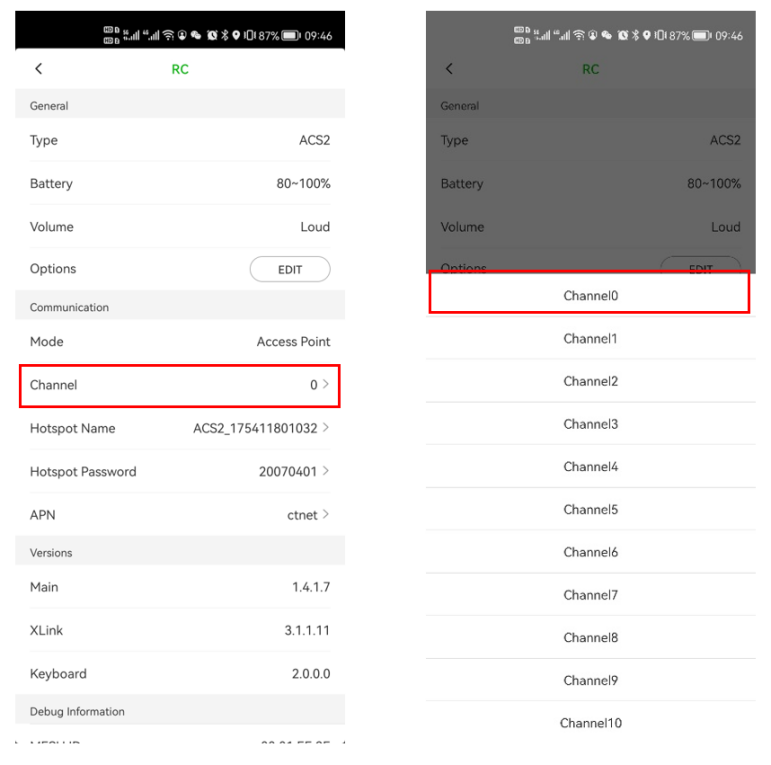
- Communication channel setting problem. Please change ACS2 2020 channel to 0, and then pair again
- WIFI signal interference problem. There are too many WIFI nearby. Please bring the XRTK module to an open field with few WIFI devices, and pair again.
Problem: XRTK4 module constantly offline
Scenario: N/A
Analysis: Unknown
Solution: remove XRTK4 and add again


Problem: Firmware download failure
Scenario: The App shows “time out” error
Analysis: significant network latency
Solution: have more attempts
Problem: ACB1 is not working well with the App
Scenario: N/A
Analysis: Android phone compatibility problem
Solution: change another android phone
Problem: Fail to enable XRTK4 hotspot
Scenario: No response when pressing F1 button
Analysis: Wrong firmware version. Probably it is due to firmware update failure. Hints:
F1 – WIFI, F2 – remote server, F3 – RTK F2 double flash – cloud server online
F3 triple flash – LNT (local server) onlinE
Solution: update XRTK4 firmware again
Problem: Fail to add XRTK4 upon LNT
Scenario: consistently receiving the error “Fail to add 1007”
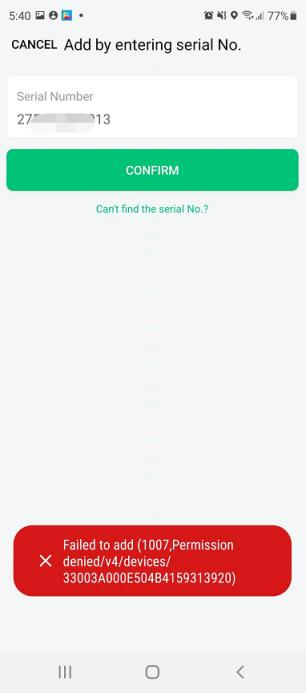
Analysis & Solution:
- Check if XRTK4 F2 light has triple flash. If not, the XRTK is not connected to LNT.
- update the XRTK4 firmware (offline update, online update using ACS2 2020)
- It could be the hardware issue of XRTK4. Please try another XRTK4.
Problem: XRTK4 and LNT fail to connect
Scenario: XRTK4 F2 single flash
Analysis & Solution: “XRTK4 F2 single” flash implicit that XRTK4 fails to connect LNT hotspot. This could be due to the following reasons:
- XRTK4 don’t have 4G SIM card inserted. Please Make sure XRTK4 has 4G SIM card inserted.
Check if LNT firmware is the latest version, higher than V1.0.0.18
Check if APP version is the latest version, higher than V3.10.16
Wrong LNT credential; Please reenter the LNT credential. Please check if your LNT credentials has spaces or unrecognized characters (#,_, *, etc.)
XRTK/LNT WIFI physical single has been interrupted.
- The distance between XRTK4 and LNT is too far away. XRTK4 lost connection.
- There are some barriers blocking the WIFI singles.
Problem: LNT network takes approximately 10~30 minutes for ACS2 remote controller and UAV to be RTK active. Sometimes it fails to connect.
Scenario: the number of satellites is less than 16 but still able to go into FIX mode.
Analysis & Solution:
- Keep ACS2 remote controller and UAV close to RTK station. All the devices must be placed in the open field to avoid single block or interference.
- ACS2 remote controller, UAV and RTK station should update to the latest version.
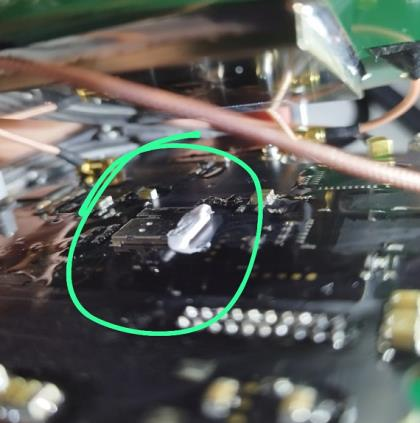
- The RTK station is physically moved. Please use single points, wait until the RTK go into FIX mode.
The RTK station is the old model. Please change and use the latest model of RTK station. The reason is that the old RTK station is not capable to search Beidou satellites. Look at the RTCM broadcasting, the five dots represent for the satellites provider, gps、glonass、beidou、stationinfo,receiverinfo. According to the scenario, the third dot become dim. This means that the old RTK model do not support Beidou satellites.

- Restart all the devices and make more attempts.
- Ask help from XAG technical support, please record the app screen when putting the RTK into fix mode. If the video is too long, please only takes the first 5 minute. Also, please provide the RTK device information, and firmware version of LNT, ACS2, UAV.
Problem & Scenario:
Put the RTK station into single positioning, but the device report setup failed. Number of satellites is greater than 16. XRTK4 station ID is valid and display on screen. LNT is put into working mode and disconnected from internet.
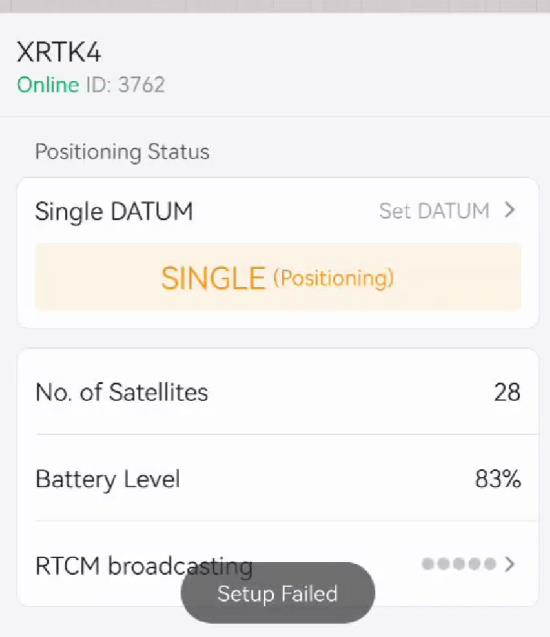
Analysis: This is due to device list in the App account is not updated properly. For example, there may be a device that removed from the list when the LNT is offline. As the LNT is offline, the device list does not sync with XAG server. This will result in messy consequence that other devices may not able to get online.
Solution:
- Restart everything
- connect your LNT to internet. login your account that allows the device list sync with XAG cloud server
UAV Flight Control Related
Problem: Fail to turn on UAV’s hotspot


Scenario: double press reset button; the wireless communication light does not change to orange.
Analysis & Solution:
- Unrecognized press pattern. Please do the following. Press the reset button for 1~3 seconds, release for 1~2 seconds, then press the reset button for 1~3 seconds again. if not, please do a cold restart. shut down the UAV and wait for 5 mins, then turn it on.
- Wrong UAV firmware. The old firmware doesn’t have the UAV hotspot feature.
If you did the online update, but it fails, please check the update status.
If you did the offline update, but it fails, please redo the firmware update of mainboard, WIFI and DLS.
Problem: Fail to configure UAV
Scenario: The cloud communication light is not green after configured
Analysis & Solution:
- Wrong LNT credential; Please reenter the LNT credential
- Forget to do a cold restart on UAV; Please turn off UAV, wait for 5 minutes and turn it on
- LNT has no access to internet; Check LNT internet accessibility, make sure LNT has good internet access.
- Smartphone is connecting 4G but not LNT; Turn off smartphone’s 4G, make sure your smartphone is connection to LNT.
Problem & Scenario: UAV fail to start or resume the flight route. 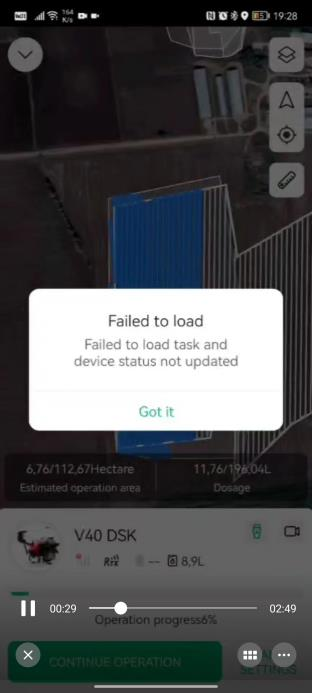
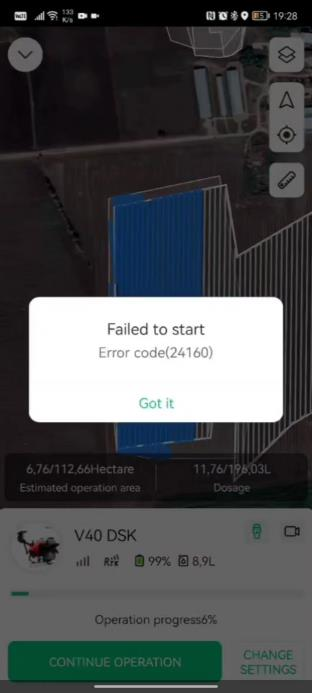
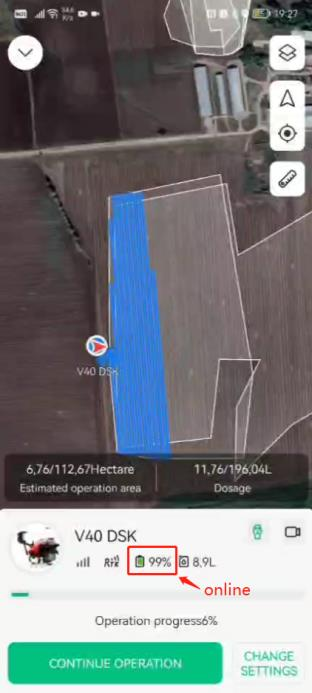
Analysis: Look at the battery icon. When the UAV gets online, the battery icon is green. Oppositely, when the UAV is offline, the battery icon turns into grey. You may see that the color of battery icon is consistently switching between green and grey. This is because the UAV is consistently switches between online and offline. This could be due to the software issue or network connection issue.
Solution:
- Check if the ACS2 remote controller is in field mapping mode. If yes, please quit ACS2 field mapping mode. Connect your smartphone to LNT hotspot.
- Put the LNT into working mode. The working mode will disable the hotspot of LNT, that can significantly reduce the signal interference and increase the signal quality.
- Use your ACS2 remote controller to manual flight the UAV. If it works fine, please restart everything. If not, the WIFI system (antenna, cables, RTK mode in flight control, etc) of UAV may have some issues.
- Update the firmware or software of all the devices, including LNT, ACS2, UAV, RTK, App.
- Regarding to this issue, find the frequency of occurrence and contact XAG technical support
Problem & Scenario: UAV fail to connect RTK station
Analysis & Solution:
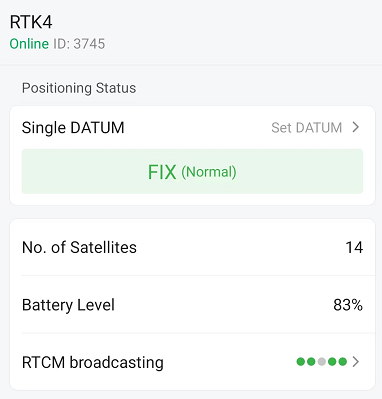
Check if RTK station is in FIX mode and RTCM is broadcasting
- Check if the UAV has the number of satellites greater than 16
- Check if the UAV RTK is active
- Change another RTK station
- Change another UAV